Today we will make our game look less dull by adding a run animation to the player character.
We will download an image containing an animation, draw it in game and then make the animation play properly. A theme throughout today’s post is that we will try the different procs for drawing graphics on the screen that Raylib provides, and see how they can be used in different circumstances.
A new thing in this post is that each section ends with a “Full code + what changed in this section” expandable item. You can click that if you need to see exactly how the code should look after each section, with comments about what lines that were changed.
As usual, this post has a companion video, it says mostly the same stuff, but in video form. This series is targeted at beginners, who are encouraged to both watch and read, as it will make everything easier to understand.
The code so far
This is how the game’s code looked at the end of part 2:
package game

import rl "vendor:raylib"

main :: proc() {
    rl.InitWindow(1280, 720, "My First Game")
    player_pos := rl.Vector2 { 640, 320 }
    player_vel: rl.Vector2
    player_grounded: bool

    for !rl.WindowShouldClose() {
        rl.BeginDrawing()
        rl.ClearBackground(rl.BLUE)

        if rl.IsKeyDown(.LEFT) {
            player_vel.x = -400
        } else if rl.IsKeyDown(.RIGHT) {
            player_vel.x = 400
        } else {
            player_vel.x = 0
        }

        player_vel.y += 2000 * rl.GetFrameTime()

        if player_grounded && rl.IsKeyPressed(.SPACE) {
            player_vel.y = -600
            player_grounded = false
        }

        player_pos += player_vel * rl.GetFrameTime()

        if player_pos.y > f32(rl.GetScreenHeight()) - 64 {
            player_pos.y = f32(rl.GetScreenHeight()) - 64
            player_grounded = true
        }

        rl.DrawRectangleV(player_pos, {64, 64}, rl.GREEN)
        rl.EndDrawing()
    }

    rl.CloseWindow()
}
and this is how the game looks when run:
Replacing the green rectangle
Today I want to replace the green rectangle that represents the player character with some animated pixelart graphics.
First off, we need some picture to draw on the screen instead of the green rectangle. Let’s use the run animation from my game CAT & ONION:

Right click the image, choose “Save Image As…” and save it in the same directory as my_first_game.odin and make sure the name is cat_run.png. On my computer it would end up at c:\code\my_first_game\cat_run.png.
As you see, this is a single image that contains four separate depictions of a cat. Each one of those depictions is called an animation frame. We will make our game display one of them at a time in order to to make the player look like a running cat. This is similar to a physical “flipbook” animation where you draw pictures on a stack of papers and then quickly flip between the pages.
FRAMES AND ANIMATION FRAMES In the previous posts we talked about frames of the game, which means a complete update of all the contents on the whole screen. We now introduce the concept animation frame, which I will sometimes also just call a frame. Which one I mean is hopefully apparent from the context.
Let’s make our game draw the image you downloaded. Just below the line player_grounded: bool, add this line:
player_run_texture := rl.LoadTexture("cat_run.png")
This LoadTexture proc tells Raylib to load the image and send the it to your graphics card (GPU), so that it is ready for being drawn. When an image is loaded into the memory of the GPU, we usually call it a texture instead of an image. We can use the variable player_run_texture later to actually draw the texture on the screen.
THE CPU AND THE GPU Your computer contains a Central Processing Unit (CPU) and a Graphical Processing Unit (GPU). The Odin code you write runs on the CPU, but when you tell Raylib to draw things, then Raylib is actually instructing the GPU to do it. Also, both the CPU and GPU has memory for storing information. When an image is stored in the CPU’s memory we call it an image, and when it is stored in the GPU’s memory we call it a texture. We usually first load an image on the CPU side and then send it to the GPU,
rl.LoadTexturedoes both these things for us. Raylib has both a concept of an image and a texture. Raylib’s images can be modified using Odin code, while the textures can be efficiently drawn by the GPU.
Let’s swap the green rectangle and in its place draw this cat texture. Replace the line rl.DrawRectangleV(player_pos, {64, 64}, rl.GREEN) with:
rl.DrawTextureV(player_run_texture, player_pos, rl.WHITE)
DrawTextureV tells raylib to draw the texture we loaded, and it will just like the DrawRectangleV proc draw it at the position player_pos. Note that we give it the color rl.WHITE instead of rl.GREEN. When drawing textures, you can use a color to tint (recolor) the drawn texture. Suppling rl.WHITE means that Raylib will not tint it.
If you run the game now, you’ll see this weird thing:
The green rectangle sure has been replaced, but currently there are two problems:
- The cat is TINY. We will add some scaling to fix this.
- You’re seeing four cats. This is because we are drawing the whole texture, but we actually want to just display one quarter of it at a time. We’ll look at that after fixing the scaling.
Also, before we continue, you might want to change you background color, that blue is a bit jarring in contrast to the color of the cat. Change this line rl.ClearBackground(rl.BLUE) and replace rl.BLUE with {110, 184, 168, 255} in order to give your game a calmer blue background.
Full code + what changed in this section (click to expand)
package game

import rl "vendor:raylib"

main :: proc() {
    rl.InitWindow(1280, 720, "My First Game")
    player_pos := rl.Vector2 { 640, 320 }
    player_vel: rl.Vector2
    player_grounded: bool
    // new line
    player_run_texture := rl.LoadTexture("cat_run.png")

    for !rl.WindowShouldClose() {
        rl.BeginDrawing()
        // changed line
        rl.ClearBackground({110, 184, 168, 255})

        if rl.IsKeyDown(.LEFT) {
            player_vel.x = -400
        } else if rl.IsKeyDown(.RIGHT) {
            player_vel.x = 400
        } else {
            player_vel.x = 0
        }

        player_vel.y += 2000 * rl.GetFrameTime()

        if player_grounded && rl.IsKeyPressed(.SPACE) {
            player_vel.y = -600
            player_grounded = false
        }

        player_pos += player_vel * rl.GetFrameTime()

        if player_pos.y > f32(rl.GetScreenHeight()) - 64 {
            player_pos.y = f32(rl.GetScreenHeight()) - 64
            player_grounded = true
        }

        // changed line
        rl.DrawTextureV(player_run_texture, player_pos, rl.WHITE)
        rl.EndDrawing()
    }

    rl.CloseWindow()
}
Scaling up the cat
Let’s scale the cat up four times, to make sure we can easily see it.
Change the line rl.DrawTextureV(player_run_texture, player_pos, rl.WHITE) to
rl.DrawTextureEx(player_run_texture, player_pos, 0, 4, rl.WHITE)
This proc does the same stuff as DrawTextureV, but has two extra parameters. The first one is rotation, for which we supply the value 0. The one after the rotation is the the scale, for which we use the value 4. Scale 1 means original scale. You can think of it as a decimal percentage value: 1 is 100%, 1.5 is 150% and 4 is 400%.
Running the game now you’ll see both the new background color and also that the drawn texture is much larger:
Full code + what changed in this section (click to expand)
package game

import rl "vendor:raylib"

main :: proc() {
    rl.InitWindow(1280, 720, "My First Game")
    player_pos := rl.Vector2 { 640, 320 }
    player_vel: rl.Vector2
    player_grounded: bool
    player_run_texture := rl.LoadTexture("cat_run.png")

    for !rl.WindowShouldClose() {
        rl.BeginDrawing()
        rl.ClearBackground({110, 184, 168, 255})

        if rl.IsKeyDown(.LEFT) {
            player_vel.x = -400
        } else if rl.IsKeyDown(.RIGHT) {
            player_vel.x = 400
        } else {
            player_vel.x = 0
        }

        player_vel.y += 2000 * rl.GetFrameTime()

        if player_grounded && rl.IsKeyPressed(.SPACE) {
            player_vel.y = -600
            player_grounded = false
        }

        player_pos += player_vel * rl.GetFrameTime()

        if player_pos.y > f32(rl.GetScreenHeight()) - 64 {
            player_pos.y = f32(rl.GetScreenHeight()) - 64
            player_grounded = true
        }

        // changed line
        rl.DrawTextureEx(player_run_texture, player_pos, 0, 4, rl.WHITE)
        rl.EndDrawing()
    }

    rl.CloseWindow()
}
Draw one animation frame at a time
Currently our game is drawing the whole cat_run.png image, which contains four frames, but we want to only draw one of those frames at a time. Let’s start by making it display the first frame, i.e. the one furthest to the left, and then later we’ll worry about making it switch to the other frames.
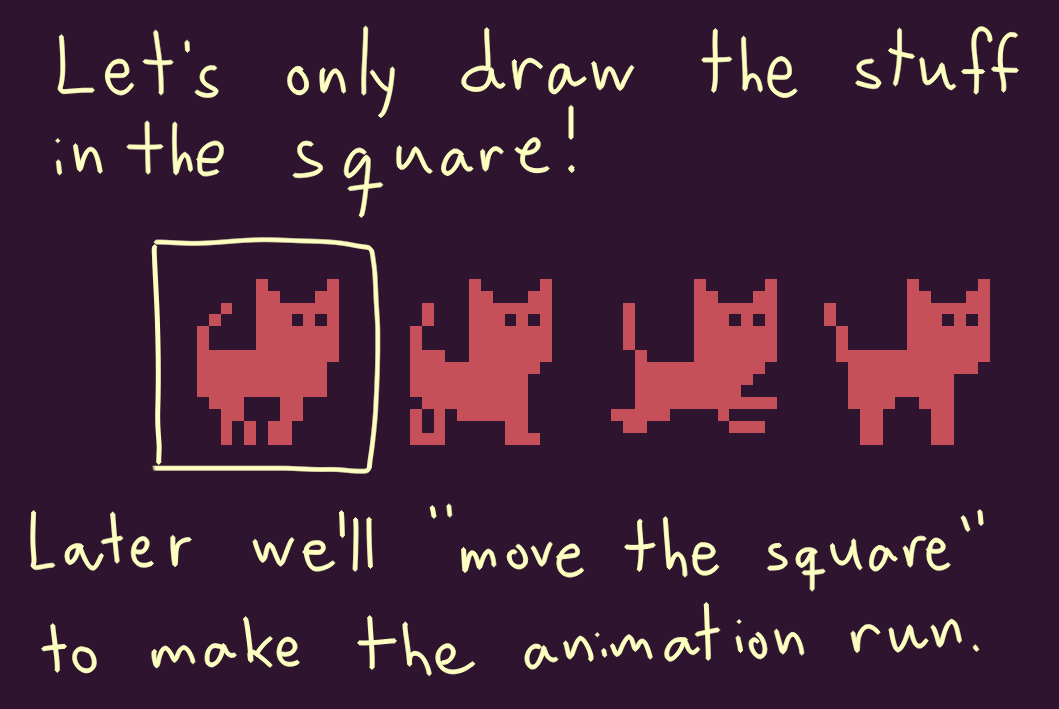
We know that our animation contains four frames. Let’s put that knowledge in a variable we can use. Under the line player_run_texture := rl.LoadTexture("cat_run.png"), add this line:
player_run_num_frames := 4
What we need now is some way to make Raylib choose only a part of the texture when drawing it. Luckily we can do that using the DrawTextureRec proc. However, in order to use that proc, we need to create a rectangle that tells Raylib what part of the texture to draw. Essentially we need to create a rectangle that surrounds the left-most frame, as shown in the illustration above.
Just above the line rl.DrawTextureEx(player_run_texture, player_pos, 0, 4, rl.WHITE), add this:
player_run_width := f32(player_run_texture.width)
player_run_height := f32(player_run_texture.height)

draw_player_source := rl.Rectangle {
    x = 0,
    y = 0,
    width = player_run_width / f32(player_run_num_frames),
    height = player_run_height,
}
In the first two lines we are fetching the width and the height of player_run_texture and storing them in player_run_width and player_run_height. Here you see that we’ve once again surrounded things with f32(), this is because the texture stores the width and height as integer numbers, but we need them to be decimal numbers later, so we do this conversion at once here. The size of the cat_run.png image is 64 pixels wide and 16 pixels high, which is what player_run_width and player_run_height will contain, respectively.
Now about the draw_player_source := rl.Rectangle {... stuff: A rectangle is a thing in Raylib that has a position (x, y) and a size (width, height). In this case we say that the position is x = 0 and y = 0. This position is measured inside the cat_run.png image, it just means the upper left corner of that image.
The width = player_run_width / f32(player_run_num_frames) part means that this rectangle will be 64 / 4 = 16 pixels wide. We could of course have written just 16 and not used the the variables player_run_width and play_run_num_frames here, but by doing it this way we could modify cat_run.png to become wider without our game breaking.
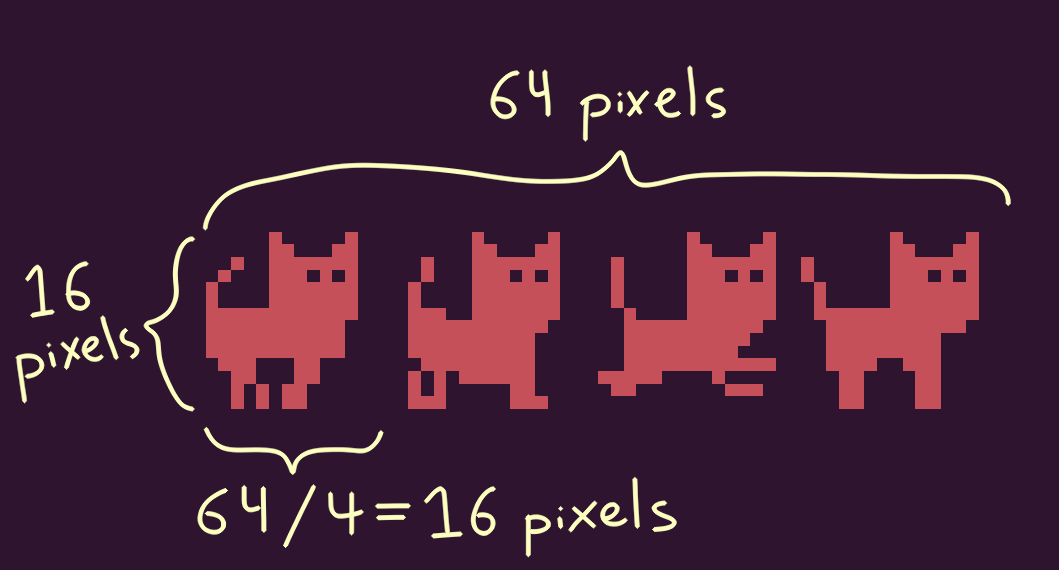
The height of the rectangle is simply player_run_height, in this case 16 pixels. This matches up with what we expect from the image above.
The rectangle is named draw_player_source, in this case, source refers to “what portion of the texture do you wish to draw?”
Finally, in order to draw our texture and use this rectangle, you’ll need to replace this line rl.DrawTextureEx(player_run_texture, player_pos, 0, 4, rl.WHITE) with this one:
rl.DrawTextureRec(player_run_texture, draw_player_source, player_pos, rl.WHITE)
If you now run the game, you’ll see this:
It is now only drawing the first frame of the cat animation. But the cat has become tiny again! Unfortunately DrawTextureRec has no scale parameter. So we have to fix this issue in another way.
Full code + what changed in this section (click to expand)
package game

import rl "vendor:raylib"

main :: proc() {
    rl.InitWindow(1280, 720, "My First Game")
    player_pos := rl.Vector2 { 640, 320 }
    player_vel: rl.Vector2
    player_grounded: bool
    player_run_texture := rl.LoadTexture("cat_run.png")
    // new line
    player_run_num_frames := 4

    for !rl.WindowShouldClose() {
        rl.BeginDrawing()
        rl.ClearBackground({110, 184, 168, 255})

        if rl.IsKeyDown(.LEFT) {
            player_vel.x = -400
        } else if rl.IsKeyDown(.RIGHT) {
            player_vel.x = 400
        } else {
            player_vel.x = 0
        }

        player_vel.y += 2000 * rl.GetFrameTime()

        if player_grounded && rl.IsKeyPressed(.SPACE) {
            player_vel.y = -600
            player_grounded = false
        }

        player_pos += player_vel * rl.GetFrameTime()

        if player_pos.y > f32(rl.GetScreenHeight()) - 64 {
            player_pos.y = f32(rl.GetScreenHeight()) - 64
            player_grounded = true
        }

        player_run_width := f32(player_run_texture.width)
        player_run_height := f32(player_run_texture.height)

        // >> from here
        draw_player_source := rl.Rectangle {
            x = 0,
            y = 0,
            width = player_run_width / f32(player_run_num_frames),
            height = player_run_height,
        }

        rl.DrawTextureRec(player_run_texture, draw_player_source, player_pos, rl.WHITE)
        // << to here
        rl.EndDrawing()
    }

    rl.CloseWindow()
}
Scaling up the cat, again
What we can do is replace the proc DrawTextureRec with a call to DrawTexturePro. DrawTexturePro allows up to both say which rectangle within the texture to look in, but also allows us to tell Raylib what rectangle on the screen to draw into.
First we’ll add that new rectangle and then we’ll swap out the proc. Just above the line rl.DrawTextureRec(player_run_texture, draw_player_source, player_pos, rl.WHITE), add this:
draw_player_dest := rl.Rectangle {
    x = player_pos.x,
    y = player_pos.y,
    width = player_run_width * 4 / f32(player_run_num_frames),
    height = player_run_height * 4
}
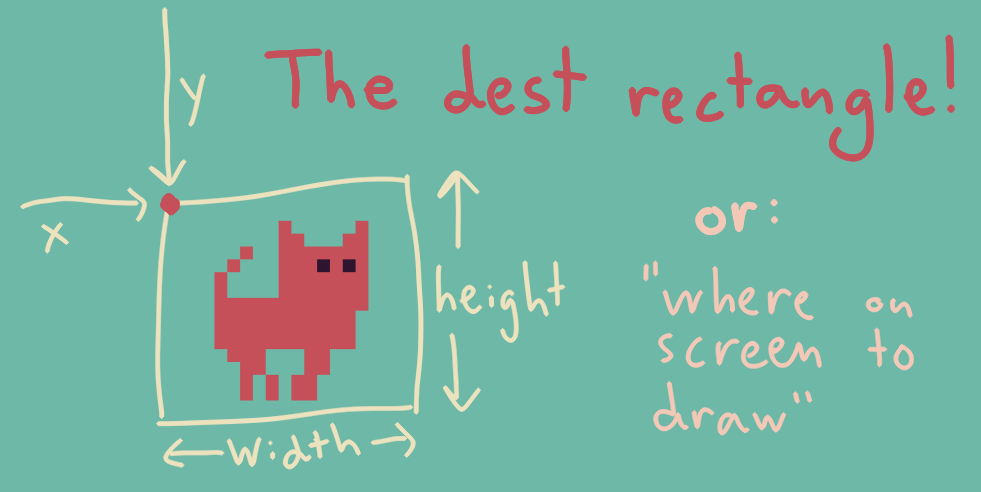
This draw_player_dest rectangle is named dest because it is short for destination: We can use it to specify an area of the screen within which to draw. The bigger we make the area, the bigger our cat will get!
It is important here to remember that the draw_player_source rectangle was used for specifying an area within the texture from which to “take pixels” and that the draw_player_dest rectangle is used to specify an area on the screen in which to “put pixels”.
In this case the rectangle will have the position x = player_pos.x, y = player_pos.y, this will make dest rectangle sit at the player’s position.
The width of this rectangle we have written as width = player_run_width * 4 / f32(player_run_num_frames), which is similar to the source rectangle, but note the * 4. This is the part that adds the scaling! Just like we previously scaled by 4 when using DrawTextureEx, we are here multiplying by 4 to make the width of the dest rectangle 4 times bigger. Same thing for the height: height = player_run_height * 4, we have added a * 4 again in order to scale the image up.
Now we just need to use this dest rectangle. Replace the line rl.DrawTextureRec(player_run_texture, draw_player_source, player_pos, rl.WHITE) with this one:
rl.DrawTexturePro(player_run_texture, draw_player_source, draw_player_dest, 0, 0, rl.WHITE)
Just like in DrawTextureRec we supply the texture and then the source rect. With this info our program knows what texture to draw + what portion of it to draw. However, now we are now supplying draw_player_dest instead of player_pos, using this rectangle we can tell Raylib both where to draw and how big area to draw on. The two zeroes after the dest rectangle is the rotation and then the origin. We will probably return to the origin later in this series, but for now I’ll just say that the origin makes it possible to shift the position relative to the dest rectangle.
Now, if you run the game you’ll see this:
Now we are getting somewhere: We are displaying the first frame of the animation and the frame is shown at a reasonable scale. Now we just need to make the our code switch animation frame every now and then, and then our cat will run!
Full code + what changed in this section (click to expand)
package game

import rl "vendor:raylib"

main :: proc() {
    rl.InitWindow(1280, 720, "My First Game")
    player_pos := rl.Vector2 { 640, 320 }
    player_vel: rl.Vector2
    player_grounded: bool
    player_run_texture := rl.LoadTexture("cat_run.png")
    player_run_num_frames := 4

    for !rl.WindowShouldClose() {
        rl.BeginDrawing()
        rl.ClearBackground({110, 184, 168, 255})

        if rl.IsKeyDown(.LEFT) {
            player_vel.x = -400
        } else if rl.IsKeyDown(.RIGHT) {
            player_vel.x = 400
        } else {
            player_vel.x = 0
        }

        player_vel.y += 2000 * rl.GetFrameTime()

        if player_grounded && rl.IsKeyPressed(.SPACE) {
            player_vel.y = -600
            player_grounded = false
        }

        player_pos += player_vel * rl.GetFrameTime()

        if player_pos.y > f32(rl.GetScreenHeight()) - 64 {
            player_pos.y = f32(rl.GetScreenHeight()) - 64
            player_grounded = true
        }

        player_run_width := f32(player_run_texture.width)
        player_run_height := f32(player_run_texture.height)

        draw_player_source := rl.Rectangle {
            x = 0,
            y = 0,
            width = player_run_width / f32(player_run_num_frames),
            height = player_run_height,
        }

        // >> from here
        draw_player_dest := rl.Rectangle {
            x = player_pos.x,
            y = player_pos.y,
            width = player_run_width * 4 / f32(player_run_num_frames),
            height = player_run_height * 4
        }

        rl.DrawTexturePro(player_run_texture, draw_player_source, draw_player_dest, 0, 0, rl.WHITE)
        // << to here
        rl.EndDrawing()
    }

    rl.CloseWindow()
}
Making the animation switch frame
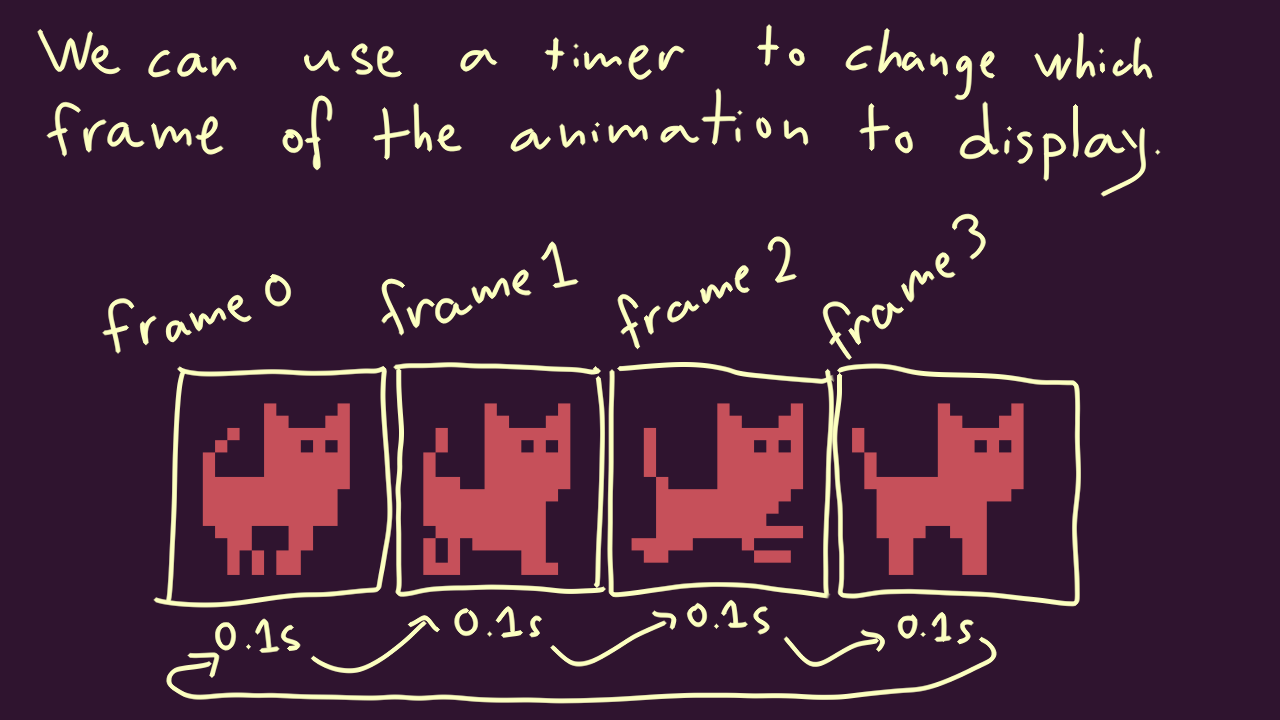
The way we will make the animation switch frame is by having a timer that counts how long the current animation frame has been visible. When it reaches a certain limit, then we will go to the next frame and restart the timer. We will use the limit 0.1 s per frame, as shown in the illustration above.
We’ll start by adding a few variables to track the timer and the current animation frame. Just before for !rl.WindowShouldClose() {, add this:
player_run_frame_timer: f32
player_run_current_frame: int
player_run_frame_length := f32(0.1)
player_run_frame_timerwill track how long the current frame has been shown, it is a decimal number (f32) because it needs to contain the number of seconds.player_run_current_frameis an int (integer number) that tracks which frame you are currently on, where the first frame is0and the last one is3. Note that when counting things we do not start at1, it is natural for computers to start at zero.player_run_frame_lengthcontains how long we want each frame to be displayed before going to the next.
Then, just before the line draw_player_source := rl.Rectangle {, add this:
player_run_frame_timer += rl.GetFrameTime()
This will add how many seconds the previous frame took to player_run_frame_timer. Remember that rl.GetFrameTime() usually reports tiny value such as 0.016 or smaller, so it will take a few frames of our game to reach 0.1 s.
After the line you just added, add this:
if player_run_frame_timer > player_run_frame_length {
    player_run_current_frame += 1
    player_run_frame_timer = 0

    if player_run_current_frame == player_run_num_frames {
        player_run_current_frame = 0
    }
}
The line if player_run_frame_timer > player_run_frame_length { will check if we’ve been on the current animation frame for longer than whatever number is in player_run_frame_length, which we set to be 0.1 s, so when that happens we will do three things:
- Increase
player_run_current_frameby 1, essentially saying “go to next frame”. - Reset
player_run_frame_timerto 0, so that it has to count up toplayer_run_frame_lengthagain until we change frame. - If
player_run_current_frameis equal toplayer_run_num_frames, i.e. equal to4, then it will setplayer_run_current_frameback to 0. This makes sure that if we went past the last frame, which is3, then we will end up back at frame0.
Now we just need to use player_run_current_frame when creating draw_player_source to make sure that rectangle looks at the correct part of the texture. Inside draw_player_source, instead of x = 0,, write this:
x = f32(player_run_current_frame) * player_run_width / f32(player_run_num_frames),
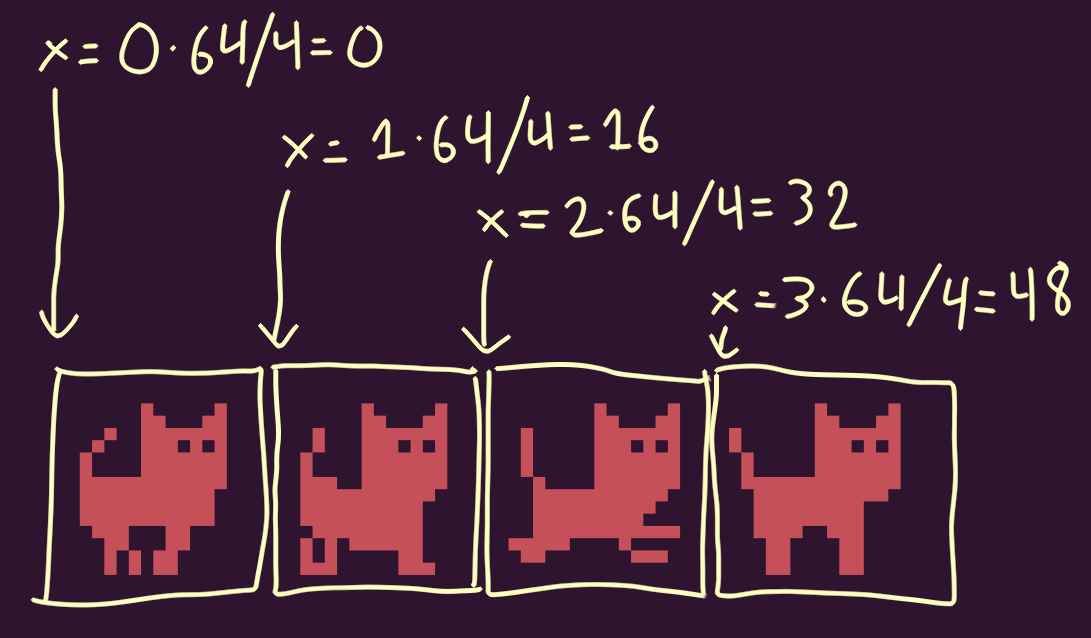
x = f32(player_run_current_frame) * player_run_width / f32(player_run_num_frames) is used to calculate the x position of the source rectangle, for different values of player_run_current_frame.
This will use the knowledge of which frame we are on to set the horizontal position of the source rectangle. If player_run_current_frame is equal to 0, then our program will calculate x to be:
x = 0 * player_run_width / f32(player_run_num_frames) = 0 * 64 / 4 = 0
since player_run_width is 64 and player_run_num_frames is 4. When player_run_current_frame is equal to 1, which means that our timer has moved us to the next frame, then x will be 1 * 64 / 4 = 16 etc. The image above illustrates the different values x will take on.
If you now compile and run the game, then you’ll see this happy running cat!
EXPERT THINGS: IF YOU WANT EXTRA PRECISE ANIMATION TIMING In the code above we wrote
if player_run_frame_timer > player_run_frame_length {. However, if you have very low frame rate, thenplayer_run_frame_timermight be bigger than2*player_run_frame_length, in which case it would be good to jump two frames forward. In order to fix that, replace theifinif player_run_frame_timer > player_run_frame_length {with aforand also replace the lineplayer_run_frame_timer = 0withplayer_run_frame_timer -= player_run_frame_length. This way you’re creating a loop that runs untilplayer_run_frame_timeris smaller than a frame length, and it will decrease the timer by one frame length each lap of the loop. Another benefit of this is that you don’t “loose time” when you setplayer_run_frame_timer = 0, as the timer could still contain something. I won’t include this is in the code, but you’re welcome to do so. It could be useful if your game runs at low framerate or if you have very fast animations.
Only problem now is that the cat walks backwards when you go the left. Let’s finish today’s post by fixing that.
Full code + what changed in this section (click to expand)
package game

import rl "vendor:raylib"
main :: proc() {
    rl.InitWindow(1280, 720, "My First Game")
    player_pos := rl.Vector2 { 640, 320 }
    player_vel: rl.Vector2
    player_grounded: bool
    player_run_texture := rl.LoadTexture("cat_run.png")
    player_run_num_frames := 4
    // >> from here
    player_run_frame_timer: f32
    player_run_current_frame: int
    player_run_frame_length := f32(0.1)
    // << to here

    for !rl.WindowShouldClose() {
        rl.BeginDrawing()
        rl.ClearBackground({110, 184, 168, 255})

        if rl.IsKeyDown(.LEFT) {
            player_vel.x = -400
        } else if rl.IsKeyDown(.RIGHT) {
            player_vel.x = 400
        } else {
            player_vel.x = 0
        }

        player_vel.y += 2000 * rl.GetFrameTime()

        if player_grounded && rl.IsKeyPressed(.SPACE) {
            player_vel.y = -600
            player_grounded = false
        }

        player_pos += player_vel * rl.GetFrameTime()

        if player_pos.y > f32(rl.GetScreenHeight()) - 64 {
            player_pos.y = f32(rl.GetScreenHeight()) - 64
            player_grounded = true
        }

        player_run_width := f32(player_run_texture.width)
        player_run_height := f32(player_run_texture.height)

        // >> from here
        player_run_frame_timer += rl.GetFrameTime()

        if player_run_frame_timer > player_run_frame_length {
            player_run_current_frame += 1
            player_run_frame_timer = 0

            if player_run_current_frame == player_run_num_frames {
                player_run_current_frame = 0
            }
        }
        // << to here

        draw_player_source := rl.Rectangle {
            // changed line
            x = f32(player_run_current_frame) * player_run_width / f32(player_run_num_frames),
            y = 0,
            width = player_run_width / f32(player_run_num_frames),
            height = player_run_height,
        }

        draw_player_dest := rl.Rectangle {
            x = player_pos.x,
            y = player_pos.y,
            width = player_run_width * 4 / f32(player_run_num_frames),
            height = player_run_height * 4
        }

        rl.DrawTexturePro(player_run_texture, draw_player_source, draw_player_dest, 0, 0, rl.WHITE)
        rl.EndDrawing()
    }

    rl.CloseWindow()
}
Making the cat turn around
We will fix this by flipping the texture of the cat when you walk to the left.
Just below the line player_grounded: bool, add this line:
player_flip: bool
This bool will start at the value false, which is fine since we are facing to the right of the screen when the game starts.
Then, whenever we press the left arrow key, we need to set the player_flip to true. Just below player_vel.x = -400 (inside if rl.IsKeyDown(.LEFT) {), add this:
player_flip = true
We also need to make sure to set player_flip to false if you press the right arrow key again, just below player_vel.x = 400 (inside if rl.IsKeyDown(.RIGHT) {), add this:
player_flip = false
Finally we will use player_flip to flip draw_player_source. Just above the line draw_player_dest := rl.Rectangle {, add this:
if player_flip {
    draw_player_source.width = -draw_player_source.width
}
When player_flip is false, then the width of the draw_player_source rectangle will be player_run_width / f32(player_run_num_frames) = 16, but when player_flip has become true, then the width will be -16. Raylib lets us flip textures this way, by using a negative width and height. You could also flip the height if you ever needed your player to be upside down!
If we run the game now, then we finally have an animating player character than flips correctly!
Full code + what changed in this section (click to expand)
package game

import rl "vendor:raylib"

main :: proc() {
    rl.InitWindow(1280, 720, "My First Game")
    player_pos := rl.Vector2 { 640, 320 }
    player_vel: rl.Vector2
    player_grounded: bool
    // new line
    player_flip: bool
    player_run_texture := rl.LoadTexture("cat_run.png")
    player_run_num_frames := 4
    player_run_frame_timer: f32
    player_run_current_frame: int
    player_run_frame_length := f32(0.1)

    for !rl.WindowShouldClose() {
        rl.BeginDrawing()
        rl.ClearBackground({110, 184, 168, 255})

        if rl.IsKeyDown(.LEFT) {
            player_vel.x = -400
            // new line
            player_flip = true
        } else if rl.IsKeyDown(.RIGHT) {
            player_vel.x = 400
            // new line
            player_flip = false
        } else {
            player_vel.x = 0
        }

        player_vel.y += 2000 * rl.GetFrameTime()

        if player_grounded && rl.IsKeyPressed(.SPACE) {
            player_vel.y = -600
            player_grounded = false
        }

        player_pos += player_vel * rl.GetFrameTime()

        if player_pos.y > f32(rl.GetScreenHeight()) - 64 {
            player_pos.y = f32(rl.GetScreenHeight()) - 64
            player_grounded = true
        }

        player_run_width := f32(player_run_texture.width)
        player_run_height := f32(player_run_texture.height)

        player_run_frame_timer += rl.GetFrameTime()

        if player_run_frame_timer > player_run_frame_length {
            player_run_current_frame += 1
            player_run_frame_timer = 0

            if player_run_current_frame == player_run_num_frames {
                player_run_current_frame = 0
            }
        }

        draw_player_source := rl.Rectangle {
            x = f32(player_run_current_frame) * player_run_width / f32(player_run_num_frames),
            y = 0,
            width = player_run_width / f32(player_run_num_frames),
            height = player_run_height,
        }

        // >> from here
        if player_flip {
            draw_player_source.width = -draw_player_source.width
        }
        // << to here

        draw_player_dest := rl.Rectangle {
            x = player_pos.x,
            y = player_pos.y,
            width = player_run_width * 4 / f32(player_run_num_frames),
            height = player_run_height * 4
        }

        rl.DrawTexturePro(player_run_texture, draw_player_source, draw_player_dest, 0, 0, rl.WHITE)
        rl.EndDrawing()
    }

    rl.CloseWindow()
}
That’s it for today!
Thanks a lot for reading! The next part is not out yet. If you wanna know when it comes out, then follow me on Twitter, Threads or YouTube.
Please leave any questions as comments on the video version of this post. I will reply to some of them in text, but I will also every now and then do a live stream where I reply to questions and take additional questions from the viewers.
Also, if you’ve enjoyed this series so far and want to support me, then please consider buying my game CAT & ONION on itch.io or wishlist it on Steam. When you buy on itch.io you also get the full Odin + Raylib source of the game.
Have a great day!
/Karl
