
Hello and welcome to the first post in this blog series on making games using Odin and Raylib. Throughout this series we will create a small 2D game with simple platforming mechanics. When we are done you’ll be able to extend the game, or take the knowledge you’ve learnt and make other, more complex games!
This series is aimed at people with little to no programming experience. Being a bit technical and having an interest in games will help. Also, people who do know programming but have never done video games programming before may find this interesting.
Here’s the companion video for this post. If you get confused by this post, then chances are that the companion video can help you understand:
I’ll begin by describing what Odin and Raylib is, after that we’ll download and setup the Odin compiler, setup a code editor and finally we’ll make our first tiny Odin + Raylib program. As a bonus at the end I’ll also show you how you can compile directly from inside the code editor.
I will provide instructions for Windows, Mac and Linux.
What’s Odin?

Odin, sometimes referred to as Odinlang, is a programming language that tries to be a modern alternative to the language C. It is a fairly simple language, making it beginner friendly. Odin is a so-called ’low level’ language, meaning that you have a great deal of control, making it suitable for creating video games. Why do video games need so much control? Because they often need to do a lot of things very quickly, so there are no hitches and no lag in the game, so there is benefit in being able to tell the computer what to do in great detail.
The term low level refers to the programming language being “close to the hardware”, which in essence means that there are few layers of automatic stuff between the code and the computer’s processor. The opposite term high level is often used to describe languages that does a great deal for you automatically, at the cost of having less control.
If you come from a high level language such as Javascript, C# or Python, then please don’t be discouraged by all this low levelness and control. Because Odin is, as I usually say, “low level with a high level feeling”. You have lots of control, but there are also many comfortable modern features to help you write expressive code. All this, while still keeping the language very simple.
What’s Raylib?
Raylib is a library, meaning a collection of ready-made code. It lets you draw graphics, create windows, process keyboard, mouse and gamepad input, and also output sound. It’s a simple and easy-to-use library created for learning game programming, so it’s a great fit for your first game.
Note that Raylib is not a game engine. What we will do here is write Odin code that uses Raylib and from that code output a stand-alone executable game that you can run. It is a straight-to-the-point and fun way to make games.
GAMEDEV LINGO The method of making games without a game enigne is often called ‘making games from scratch’.
Odin comes with built in support for Raylib, you do not need to install anything extra after we’ve gotten Odin up and running.
Can you make proper games with Odin and Raylib?
Yes. I’ve recently made and shipped a whole game called CAT & ONION using Odin and Raylib. Here’s a trailer, to give you a sense of what’s possible:
Download and setup the Odin compiler
THESE COMPILER SET UP INSTRUCTIONS ARE SLIGHTLY OUTDATED. I have up-to-date instructions in this video. You can also follow the official instructions at https://odin-lang.org/docs/install/. If you follow the video or the official instructions, then you can skip to Download Sublime Text, a code editor:
Before we get started with the code we’ll have to download and setup some software. I urge you to push on through these perhaps boring setup steps, as things will get much more fun once we start writing code.
In order to turn the Odin code we are about to write into a program you can run, you need to download the Odin compiler. Compilation is the process by which the computer takes code and outputs a program you can run.
Here are my recommended ways for setting up the Odin compiler:
WINDOWS Follow my instructions below.
MAC / LINUX Follow the official instructions at https://odin-lang.org/docs/install/. Do not download the pre-compiled Odin compiler, follow the instructions on building the Odin compiler from source.
Simple Odin compiler setup for Windows
The official Odin Windows install instructions will have you install the massive Visual Studio code editor, which is not necessary, therefore I provide these simplified instructions for Windows.
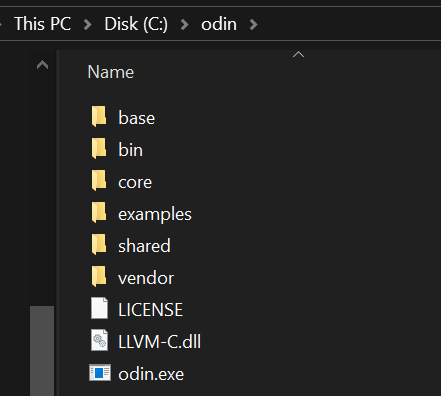
Step 1: Download compiler from here https://github.com/odin-lang/Odin/releases/latest. Scroll to the bottom and download the file called odin-windows-amd64-dev-<year>-<month>.zip. When the download has finished, extract the contents to the folder c:\odin. You should end up with something that looks like this:
Step 2: The Odin compiler needs some additional software to run on Windows (the MSVC Linker and the Windows SDK). One way to get hold of them is, as the official installation instructions say, to install Visual Studio. Instead, I propose you download ‘PortableBuildTools’. It is a tool that downloads the things that Odin needs, without having to install the giant Visual Studio code editor. Go here https://github.com/Data-Oriented-House/PortableBuildTools and download the latest release. Run the program you downloaded.
WINDOWS SECURITY WARNING You might get a Windows security warning when starting the PortableBuildTools setup because PortableBuildTools isn’t from a certified developer. In that case you have to click ‘more info’ and ‘run anyway’. It is safe application used by many, so nothing to worry about.
When you run it you’ll see this:
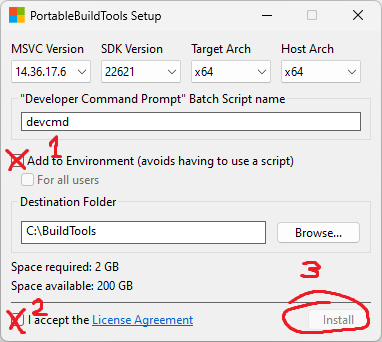
Click the (1) Add to Environment checkbox, so that the Odin compiler can find the installed software. Thereafter you need to (2) accept a license agreement and then click (3) Install. When it’s all done the installer might tell you to log out and in again, in which case you should do that.
You now have a working Odin compiler.
Download Sublime Text, a code editor
Soon we’ll write some Odin code. But first we need a program to write our code in!
I write Odin code using Sublime Text. It is a simple and snappy code editor. Download and install it from here: https://www.sublimetext.com/
Throughout this series I’ll sneak in some good Sublime tips every now and then, to accelerate your workflow.
Since posting this I have created a Sublime Text setup video that also includes how to get code completion working:
Let’s write some Odin code!
Open Sublime, type in the code below! Let’s first make it compile and run and then I’ll go through what it all means.
package game

import rl "vendor:raylib"

main :: proc() {
    rl.InitWindow(1280, 720, "My First Game")

    for !rl.WindowShouldClose() {
        rl.BeginDrawing()
        rl.ClearBackground(rl.BLUE)
        rl.EndDrawing()
    }

    rl.CloseWindow()
}
When you’ve typed it all in, go ahead and save it to c:\code\my_first_game\my_first_game.odin. You’ll have to create those code and my_first_game directories.
MAC / LINUX Save the code to a folder such as
~/code/my_first_game, where~denotes your home directory.
Let’s compile the code and run our game!
Let’s turn that code into a program using the Odin compiler.
For our first compile, we’ll use the Command Prompt, which lets us execute programs using text commands. At the end of this post I will go through how to set things up so you can build from within Sublime.
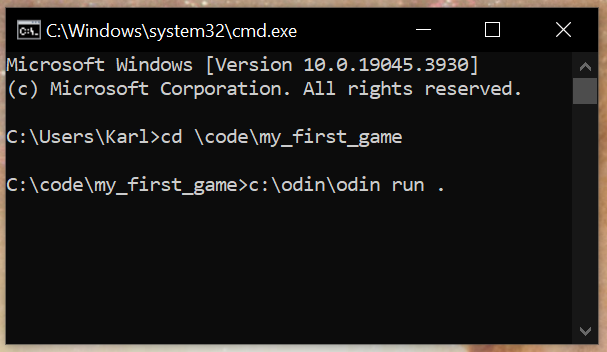
WINDOWS Open start menu and type “Command Prompt”. Launch that app. In it, write this:
cd \code\my_first_game
c:\odin\odin run .
MAC / LINUX Find an application called ’terminal’ or similar. In it, write this:
cd code/my_first_game
odin run .
Note that the period . is part of the run command!
When you hit enter on that second command, then the Odin compiler should compile and run your game. You should see this window appear:
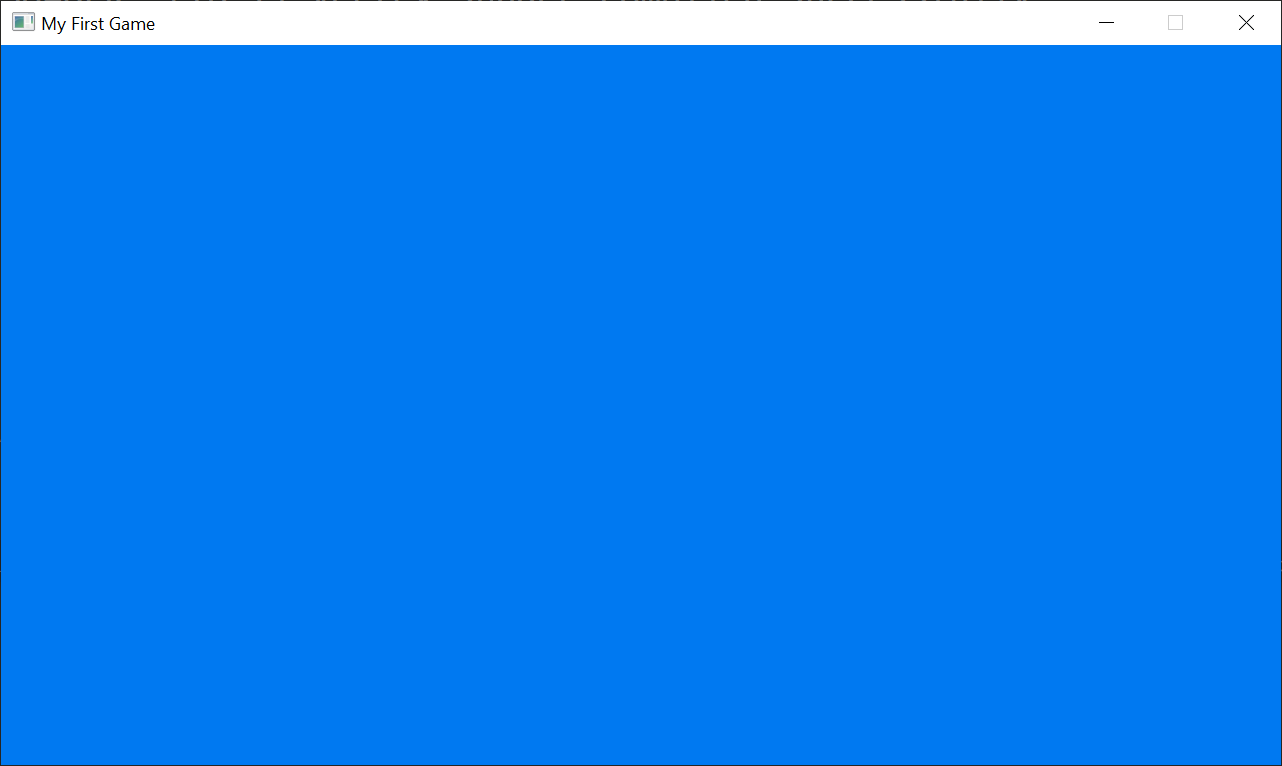
It’s not much, but soon we’ll add things moving around in there!
WANNA BUILD, BUT NOT RUN?
odin run .will compile and run your game. You can also useodin build .in which case it does not run your game after a successful compilation. In both casesmy_first_game.exeis outputted next to your Odin code, so you can run the game later without needing to involve the Odin compiler.
Did anything go wrong?
If your program did not compile, chances are you mistyped something in the code. When you run the compiler from the command prompt and there is an error, then you should see some error messages:
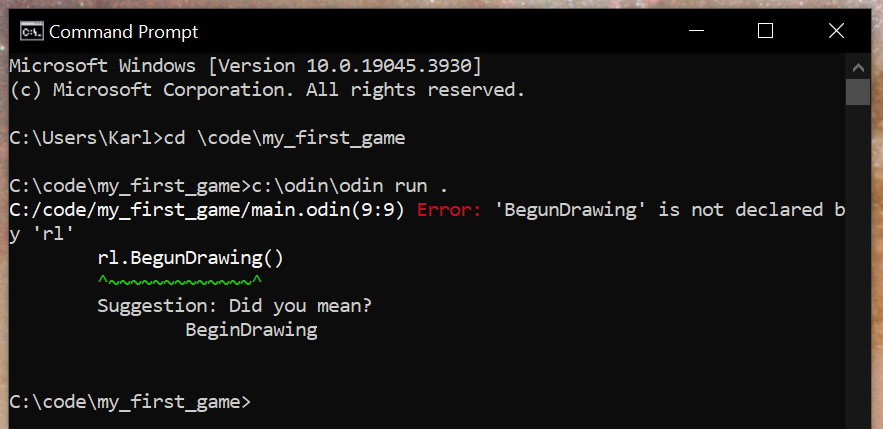
In this case, I had accidentally typed BegunDrawing instead of BeginDrawing. The error message is in this case helpful and suggests what I might have meant instead. The compiler won’t always be able to be that helpful, sometimes you’ll have to do some detective work yourself to figure out why your program didn’t compile.
So what does that code we typed in really do?
package game

import rl "vendor:raylib"

main :: proc() {
    rl.InitWindow(1280, 720, "My First Game")

    for !rl.WindowShouldClose() {
        rl.BeginDrawing()
        rl.ClearBackground(rl.BLUE)
        rl.EndDrawing()
    }

    rl.CloseWindow()
}
Let’s start by looking at the line main :: proc() {. This line defines a new procedure. A procedure, or proc as I will call it, is a block of code with a name attached. The code inside the proc can be run if you know the proc’s name. In this case we are creating a proc called main. When an Odin program starts, it looks for a proc called main and starts the program from the top of that proc. The proc runs from the opening curly brace {, to the matching closing curly brace }, as shown below:
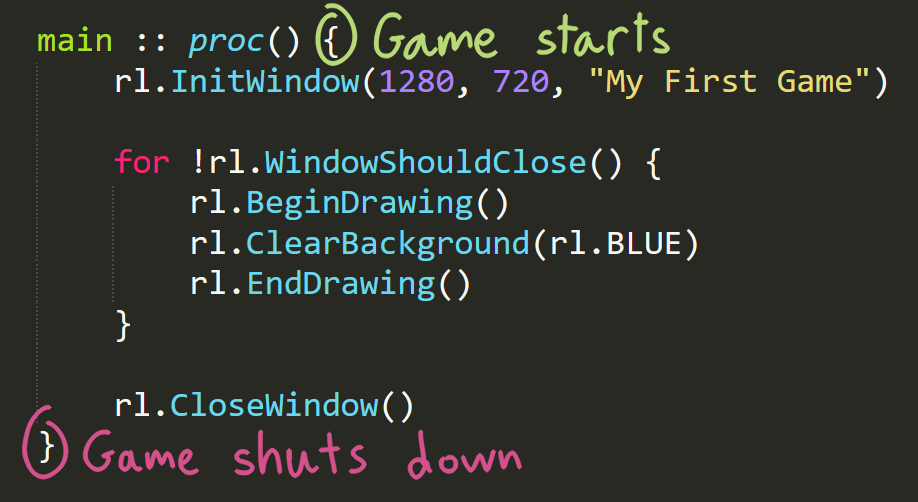
main proc. All procs run from the opening curly brace { to the closing curly brace }
When the closing curly brace } of the main proc is reached, then the game has finished running and will shut down. In essence your whole game goes in-between those two curly braces of the main proc.
PROCEDURES? FUNCTIONS? Those who have programmed before might recognize procedures by the word function. Those two words mostly mean the same thing, but the word procedure has a bit of a wider defintion.
Looking inside the main proc we see a bunch of lines that all start with rl. All those lines are calls to procs within Raylib, i.e. code that is instructing Raylib to do stuff. By proc call I mean that you use the name of a proc in order to run the code inside that proc. As mentioned before, Raylib can draw graphics, create windows and much more. The line rl.InitWindow(1280, 720, "My First Game") creates a window of size 1280x720 pixels and gives the window the title “My First Game”.
The line for !rl.WindowShouldClose() { makes a loop that runs for as long as the window created by Raylib wants to stay open. rl.WindowShouldClose() is a proc in Raylib that essentially tells us if the user pressed the close button of the window. But we want to know if the user didn’t press it, which is why we put the ! in front to negate the answer from Raylib. The stuff between the two curly braces {} is the code that the loop will run, over and over again, until the user tries to close the window.
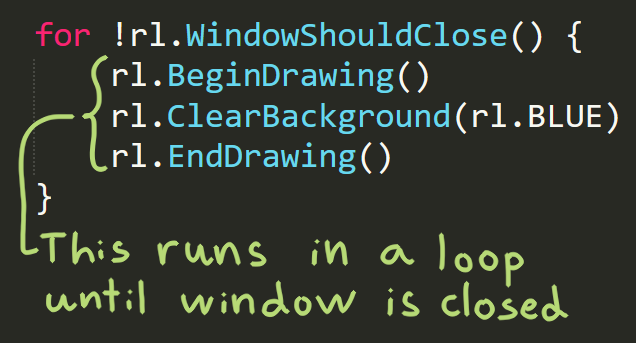
This loop will be the ‘main loop’ of our video game. Video games consist of constantly updating images on the screen, called frames. Gamers often talk about how many ‘FPS’ or Frames Per Second their game runs at, which essentially means how many times per second our for manages to loop. The more stuff you add in there, the lower the FPS.
WHERE’S THE WHILE LOOP? You may have seen
whileandforloops before. In Odin there are onlyforloops. If you make aforloop in Odin that has only one condition, such as asking Raylib if the Window should stay open, then it works the same way aswhileloops in other languages.
The line rl.BeginDrawing() instructs Raylib to start a new frame and rl.EndDrawing() instructs Raylib to end the frame. In-between those two lines there’s a line that clears the whole screen with a color, which is what makes our game look blue.
DON’T SKIP EndDrawing()! You can’t skip the BeginDrawing/EndDrawing calls. Internally, the
rl.EndDrawing()proc does lots of housekeeping stuff such as making it possible to move and close the window. It is also responsible for asking the operating system if any keys or gamepad button were pressed. It is also in there that it actually sends off the things we want to draw to the graphics card.
Our loop will terminate if the user presses the close button on the window, in which case it will leave the loop and then run the final line of main: rl.CloseWindow(), after that our game shuts down because the main proc is done.
Finally, I’ll just say something about the first two lines of our program:
import rl "vendor:raylib" tells the Odin compiler that we want to use Raylib in our program. The Odin compiler comes with built in support for Raylib, as part of the “vendor” collection of libraries. We say that we are importing the Raylib package. All those things in Raylib will end up under the rl prefix, which is why those procs we used in our program all started with rl
MORE VENDOR PACKAGES There are numerous other vendor packages, you can see them all by looking into
c:\odin\vendor(or similar path if you’re on Mac / Linux). You’ll find stuff like DirectX, OpenGL and SDL in there.
What about the first line: package game? All odin files within a directory are said to be part of the same package. And all those files must start with the same package NAME line. The name you put there is a technicality only used if you export your code as library, for an executable like our game it does not matter, so we’ll just put game there.
Compiling directly from within Sublime Text
As a final thing in this blog, we’ll look at making it possible to compile and run your game from within Sublime Text, at the press of a button. This will save you a lot of time during the rest of this series! In order to do this, we’ll need to create a Sublime Build System.
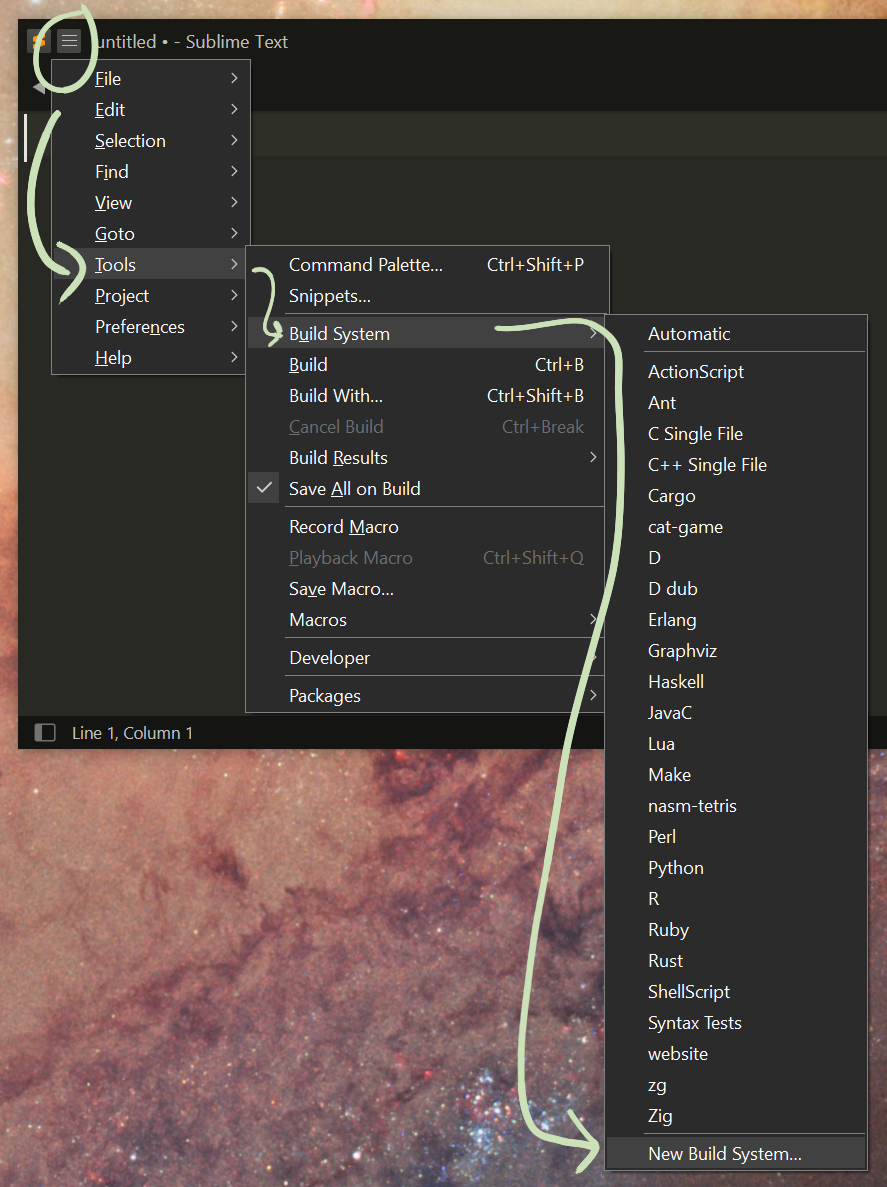
A Build System is small file that instructs Sublime how to compile our game. In Sublime, click the top left menu button and go to Tools -> Build System -> New Build System…
Sublime will pop up a new build system file, copy these lines into that file:
WINDOWS:
{
    "working_dir": "c:/code/my_first_game",
    "shell_cmd": "c:/odin/odin run .",
    "file_regex": "^(.+)\\(([0-9]+):([0-9]+)\\) (.+)$"
}
MAC/LINUX:
{
    "working_dir": "~/code/my_first_game",
    "shell_cmd": "odin run .",
    "file_regex": "^(.+)\\(([0-9]+):([0-9]+)\\) (.+)$"
}
and then save it. Name it something like my_first_game.sublime-build. Make sure to save it in the folder Sublime suggests (the folder’s path is probably something like Sublime Text 3/Packages/User). Make sure you use the .sublime-build filename ending, otherwise Sublime will not find it.
This file tells Sublime to compile our game using the command odin run .. The working_dir part tells sublime to run the command from within the directory where we saved our code. You do not need to tell the Odin compiler exactly which files we wish to compile, the period . at the end of the command denotes the ‘current directory’, which means that it takes all the files in the working_dir and compiles them into a package. However, we only have one file (main.odin), but if we add more odin files later then they will get picked up as well.
NOTE ON PATHS On Windows I’ve use the absolute
c:/odin/odinpath. You could also addc:/odinto the PATH environment variable in order to makeodinavailable from anywhere on the system. But it doesn’t really matter. Also please note that I use/in the path, instead of\. If you use\then be aware that you have to type two of them, i.e.\\. This is due to\being a special character.
Return to main.odin and go to the top left menu -> Tools -> Build System -> my_first_game. If you now press F7 or Ctrl+B, then Sublime will use your shiny new build system to build and run your game. Any compilation errors will end up in the Console.
As a bonus I also snuck in that “file_regex” line. That line help Sublime find any errors the Odin compiler outputs. If there are errors, then it will show the errors clearly on the line where the error occurred. It also lets you jump to the next error by hitting the F4 key.
That’s it!
Thanks for reading! I hope to see you in part 2, where we will add a player that we can control.
Please leave any questions as comments on the video version of this post. I will reply to some of them in text, but I will also every now and then do a live stream where I reply to questions and take additional questions from the viewers.
Also, if you’ve enjoyed this series so far and want to support me, then please consider buying my game CAT & ONION on itch.io or wishlist it on Steam. When you buy on itch.io you also get the full Odin + Raylib source of the game.
Have a fantastic day!
/Karl