In this post I’ll share some details on how I wrote the first book about the Odin Programming Language. I’ll talk about how I got started, what the process was like, as well as some technical things related to writing programming books.
The book is called “Understanding the Odin Programming” language. It’s a digital book (HTML and EPUB). It was released on December 6, 2024. The book is available at https://odinbook.com/
A happy accident
Exactly how one gets started on a project varies. I didn’t plan to write a book until I was already in the middle of doing it. It started with me writing an introductory blog post about Odin. I thought that it would be nice to write something that is reader-friendly and also tries to highlight interesting things about the language.
The resulting blog post is called “Introduction to the Odin Programming Language”. It took a few days to write. It’s mostly improvised, I just wrote down things I wanted people to understand, while trying to make it friendly to newcomers. You can read it here: https://zylinski.se/posts/introduction-to-odin/
My creative projects often seem to start with some kind of “happy accident”: Something small that leads to something bigger. I didn’t know I had written the seed of a whole book and that I would be working on it for many months.
Book ideas
Quite quickly after posting the blog post, I was already thinking about writing something bigger. Writing the blog post had come quite naturally to me, and I found it fun. I also posted the blog post on Twitter, where people quickly noted that I should turn it into a book.
However, I wasn’t sure what a book would mean. A physical book? An e-book? What’s the target audience? What does it try to teach? Do I want to write a book?
Figuring out the answer to “What does it try to teach?” was the easy part. I’ve answered many beginner questions on the Odin Discord server (the official Odin chat). In order to answer some questions, I repeatedly had to explain several separate ideas. These separate ideas were all key in truly understanding the answer. Some of these things were not covered in the official documentation, and if they were, there was often no “connection between the dots”: You needed to spend a lot of time figuring things out by yourself and see how things were connected. That’s what I wanted to fix: Bridge the gap between the online documentation and years of using Odin, hopefully saving the reader a lot of time.
I wasn’t sure about the target audience at the start. I wanted to try writing a few different chapters and see what style I preferred. I hadn’t yet decided on if I wanted a physical release, but I figured a digital release (some kind of e-book) would be good starting point.
Choosing technical tools
How does one write a book? What software do you use? What is the format you write in? What is the output format? And what software is used to turn the input into the output? The answers vary a lot depending on the type of book. But this is a programming book, so things are now going to turn very nerdy.
Early on, I realized that I wanted this digital book to be available in HTML format. People who are learning a programming language are likely to be reading on their computer screen, next to their code. I didn’t want to release a PDF, because I really dislike reading PDFs on a computer screen. A HTML page is usually much nicer!
Both the HTML and EPUB edition can be PDF-printed if you really want to.
So here’s what I did: I took the intro-blog-post I had written, and I used that as a starting point. But I wanted my my book have a custom look and feel. I wanted:
- Complete control over how text was laid out
- Small “bubbles” on the side with extra info
- Layout should not depend on javascript
- As few files as possible, preferably a single HTML file.
I didn’t know if the last point was possible when I started. But I knew that if I wanted to get there, then I needed a lot of control over how the HTML was assembled.
The blog (you’re currently reading it) uses hugo, which is an offline website generator that turns markdown into HTML. The “introduction to odin” blog post is written in markdown. I wanted to write my whole book in markdown and turn that into HTML. But in order to get all this control, I felt like I should ditch hugo for generating the book.
Markdown -> HTML generation basics
I started writing an Odin program that took my markdown, parsed it and constructed a HTML file from it.
Yes, a book about Odin, constructed by an Odin program!
My code starts by splitting the markdown into lines and checking what each line starts with:
# Heading-> Generate a<h1>and enclose the heading text in that.## Heading-><h2>tag etc- Lines separated by line breaks: Group as paragraphs, meaning surround them with
ptags:<p>The line</p>
There is something to note here: Since I only needed to support the subset of markdown that I actually used, then I could cut a lot of corners. I didn’t even write proper tokenization. I just check what a line starts with, if there are line breaks, etc. I will not release this tool, because it is so specific to my book. It literally contains hard coded things that are unique for my book, and it will break on some types of markdown. But that’s a good thing: It’s a simple program that just does what it needs to. Making a general purpose markdown -> book converter would take ages! Instead I slapped together what I needed for my own purposes.
After a while I needed to support <code></code>, strong and italic. For that I wrote a small procedure which looks for symbols such as `, _ and * and turns them into HTML tags. That way, I could just run each paragraph of text through that procedure. I also added link support to it: [This is a link](https://website.com). When it sees [, then it tries to assemble a link by looking for the ] and the (). Again, it might break for some malformed links. But I’m not putting malformed links into my book.
Quite soon, I had a program that could output my original blog post, but with full control over how it did it. I then added the table of contents, that went on the side of the screen. That was done by just saving away some metadata each time I parsed a line starting with one or more # (the headings).
The generated HTML was combined with a “footer” and “header”. That means I have a header.html and footer.html file. I put my generated HTML between the contents of those files and output a new HTML file.
Side bubbles
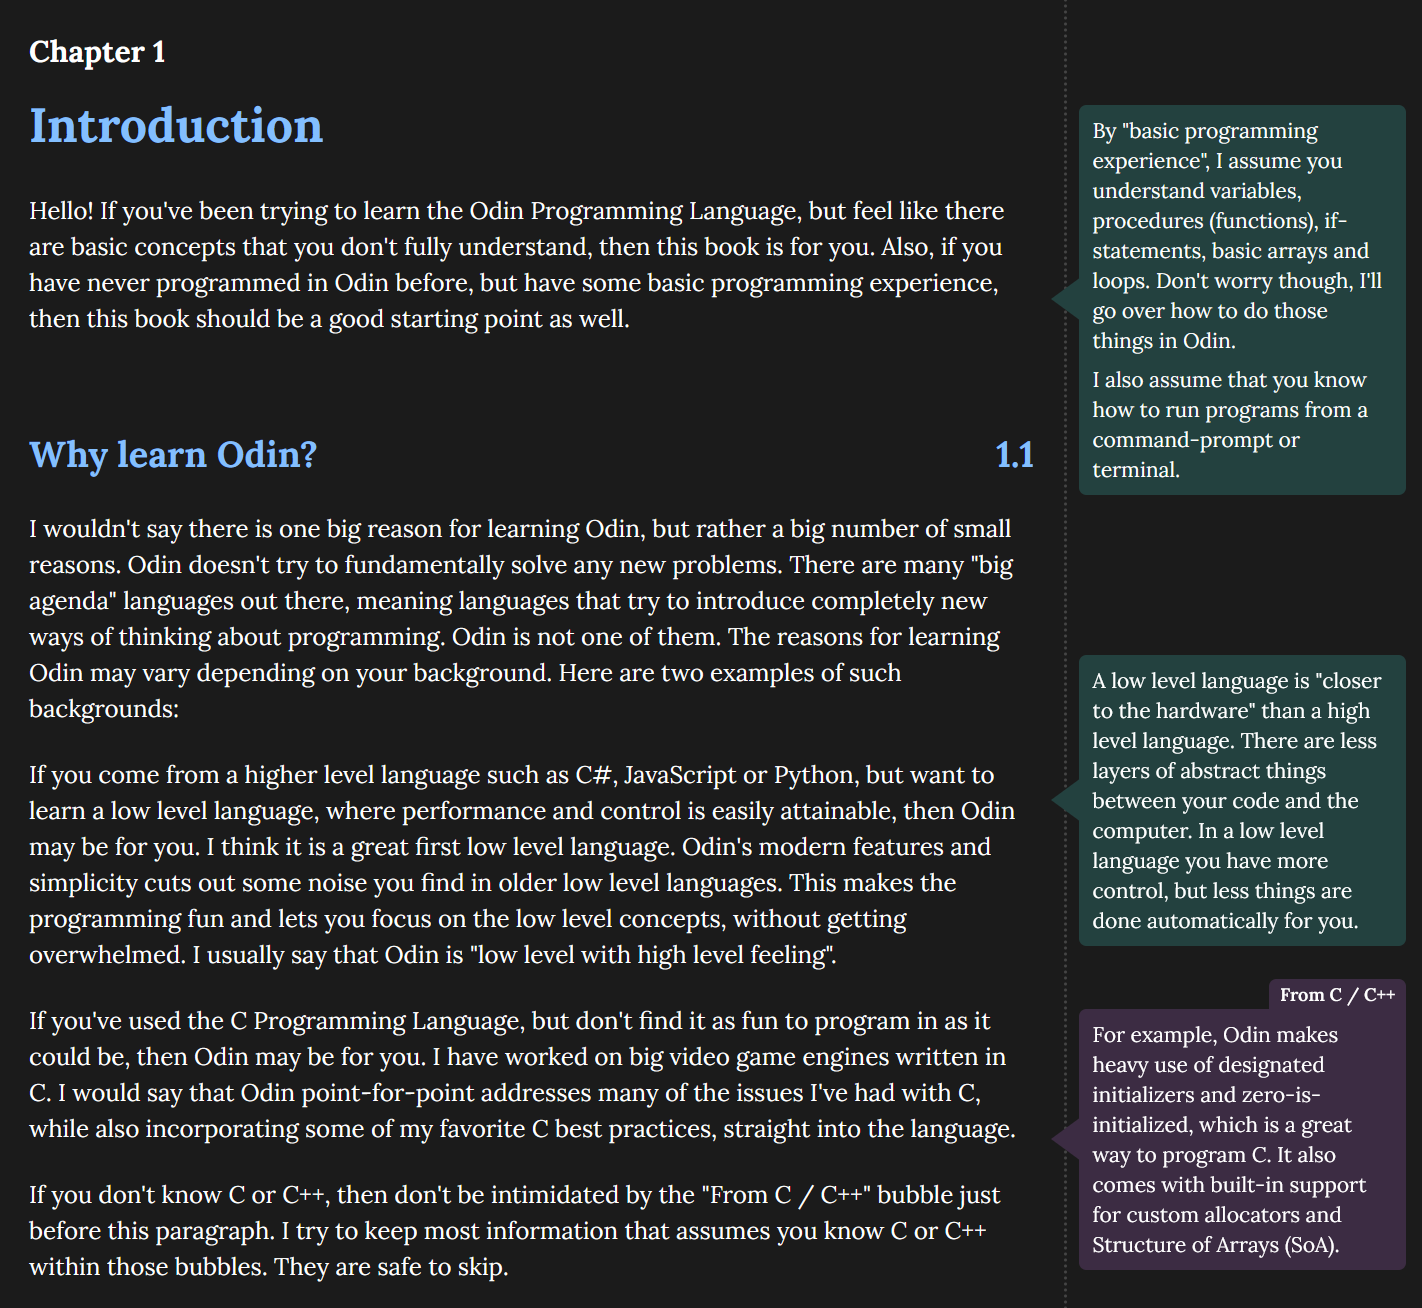
I was excited about adding “side bubbles”: Extra information that live in a little bubble on the side. I did some CSS stuff to make those bubbles have a little arrow. Since the view is of fixed width, that means things are not moving around vertically. So I could even do fine-tuned adjusted of the bubble positions. In normal markdown the following is a block quote:
> This is a block quote.
But I made it so that all those > resulted in side bubbles.
I could fine-tune the bubble’s position by writing a number directly after >:
>30 This bubble will be pushed up 30 pixels on the screen.
There are special “From C / C++” bubbles. Those are created by adding C after >
>C In C, you can see!
Responsive CSS
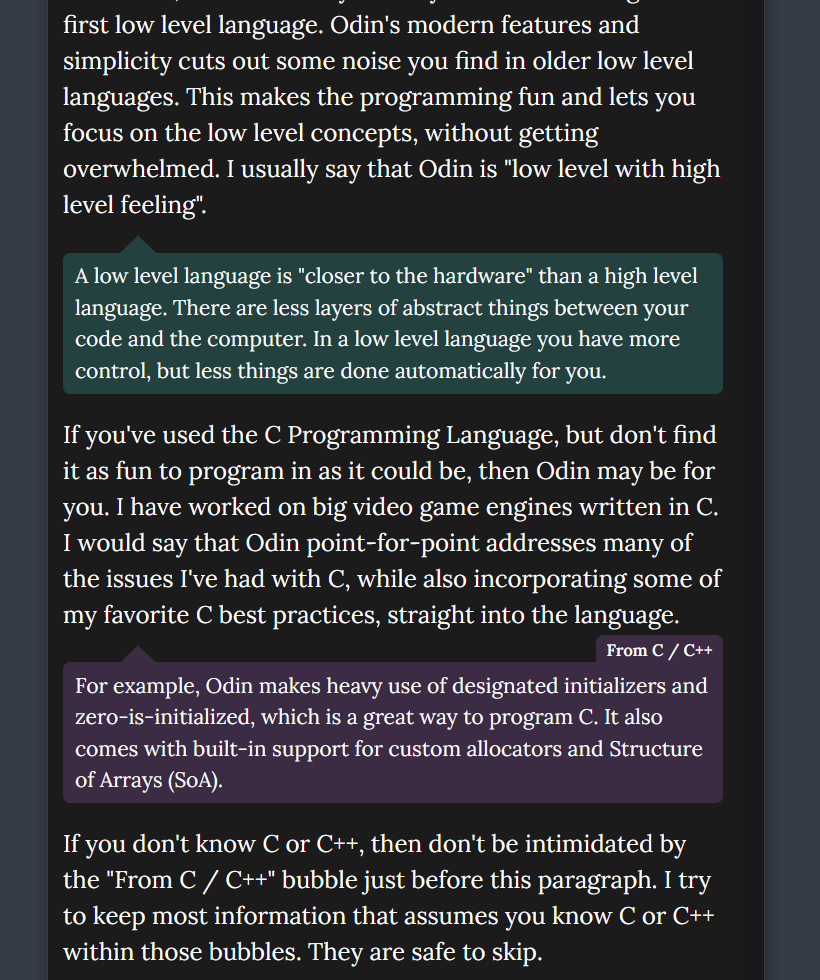
If you make your screen too narrow, then there is no room for the side-bubbles. When it gets to that point I switch to a view where the side bubbles end up beneath the text.
That’s more like these classic blog block quotes.
That’s done using CSS media queries:
@media screen and (max-width: 955px), print {
	/* CSS to make side bubbles appear
	under text instead of on the side */
}
Also note the print at the end of that line. I use this format when printing as well. Printing can’t use side bubbles since they are cut off in very awkward ways.
The bubble-under layout is used when reading the book on phone as well, since those screens are naturally narrow. To make your book look good on phones you usually have to add this inside the <head> tag of your document:
<meta name="viewport" content="width=device-width, initial-scale=1, shrink-to-fit=no">
Inspiration from Bob Nystrom
I reached out to Bob Nystrom, author or “Crafting Interpreters”. I asked him about how to publish books. He said that he did almost everything himself and linked to his blog, where there are some posts about how he made his books: https://journal.stuffwithstuff.com/category/book/
I can’t recommend his blog posts enough!
His style really resonated with the way I was working. He had also made his own script that assembles HTML, and everything was custom-made for total control. It was nice to know someone had successfully worked like this before.
Bundling everything inside the HTML file
If you’ve bought the HTML version of my book, then you might have noticed that it is a single HTML file. This HTML file is around 3 megabytes! The size is due to all the images and fonts being bundled inside it. It’s like a PDF, but nicer to use!
The images are added in the markdown as normal markdown image tags:

When the book-building program runs into this tag, then it loads the image (swizzle.jpg in this case). It base64 encodes the image data (my Odin program uses "core:encoding/base64"). The base64 encoded data is put into an image tag inside the final HTML:
<img src="data:image/FILE_FORMAT;base64,DATA" alt="ALT_TEXT">
So for a jpeg it says image/jpeg and DATA is replaced with the resulting base64 encoded data. That way I was able to embed every single image into the HTML.
It’s also very important to bundle the fonts: If someone’s internet fails, then the book will look very bad. Also, the side-bubbles are positioned quite carefully, so it’s important that the correct font is always used.
To accomplish this I made a fonts.css file, which contains the data of the three fonts I use, base64 encoded! You can do that in CSS like so:
@font-face {
	font-family: "Font Name";
	src: url('data:font/ttf;charset=utf-8;base64,DATA') format('truetype');
}
Replace DATA with your base64 encoded font data. For base64 encoding the font files, I made this Odin program:
package base64_enc

import "core:encoding/base64"
import "core:os"
import "core:fmt"

main :: proc() {
	if len(os.args) == 1 {
		return
	}

	path := os.args[1]

	if in_data, in_data_ok := os.read_entire_file(path); in_data_ok {
		if b64_enc, b64_enc_err := base64.encode(in_data); b64_enc_err == nil {
			os.write_entire_file(fmt.tprintf("%v.base64", path), transmute([]u8)(b64_enc))
		}
	}
}
I opened the resulting base64 encoded files and pasted their contents into my fonts.css file. With that fixed, I had my whole book in a single, portable HTML file!
Non-bundled samples
The all-in-one HTML file was only for making it easy to download the book when you buy it. Sort-of how you can download a single PDF and get everything.
However, I wanted an online sample that did not have the bundled images and fonts. Bundling them inside an online sample would put a lot of stress on the server, since I doubt it can cache the base64 encoded data. You can see the sample here: https://odinbook.com/sample.html When I generate the sample page, I feed the build program a special flag. That flag makes it only include the first three chapters (it also does some extra hard-coded stuff, like adding the “End of sample. Thanks for reading! blabla” text). When it comes to images, I just generate normal image tags and copy the images to the output directory. The fonts are supplied by google fonts. That way I minimize traffic for the sample!
Checking code
My book contains code examples, such as this one:
Nice_People :: enum {
	Bob,
	Klucke,
	Tim,
}

nice_rating := [Nice_People]int {
	.Bob = 5,
	.Klucke = 7,
	.Tim = 3,
}

bobs_niceness := nice_rating[.Bob]
I wanted automatic testing of this code. Whenever my book-building program sees the triple backticks ``` that trigger a code block, then it does the following:
- Save the code in an array for later processing, also save the markdown line number number
- At the end of book generation, generate
test_code.odinand paste each example into a procedure namedtest_MARKDOWN_LINE - Make the book building program run that Odin file:
odin run test_code.odin -file - Stop the book building if there are errors
This way I could catch many errors in the code.
Sometimes I write code that is broken or incomplete. In those cases I add nt (short for No Test) after the three backticks. That will avoid testing of that block. I also support putting e when the example is an error, which will avoid testing of that code as well (sometimes I want to show something that is incorrect).
Many examples contain a
mainproc. You can’t have more than one procedure called main. So I go through the test code and rename the main procs to something unique before running the code.
Syntax highlight
I wanted pre-generated syntax highlight of the examples. The code that processes the blocks of code goes through the code and parses it. It looks for keywords, numbers, comments and and strings. It creates HTML <span> tags with a CSS class that says if it is a keyword, number, comment or string. The CSS colors it correctly.
This gives me pre-generated highlighting without the need for any third-party javascript library or anything like that.
Dark and light mode
The book supports dark and light mode, with possibility to switch between them. I put this javascript in header.html:
function toggle_dark() {
	if (document.documentElement.classList.contains("dark")) {
		document.documentElement.classList.remove("dark")
	} else {
		document.documentElement.classList.add("dark")
	}
}

var light_from_search = window.location.search && window.location.search.includes("light")
var dark_from_search = window.location.search && window.location.search.includes("dark")
var dark_from_media = false

if (window.matchMedia) {
	if(window.matchMedia('(prefers-color-scheme: dark)').matches){
		dark_from_media = true
	}
}

if ((dark_from_media && !light_from_search) || dark_from_search) {
	document.documentElement.classList.add("dark")
}
Note how it uses dark mode if window.matchMedia('(prefers-color-scheme: dark)') is true. That kind-of checks what your OS wants. I also support putting ?dark and ?light at the end of the URL. That’s what the window.location.search.includes("light") stuff checks for.
The toggle_dark function is used by a button on the page that switches between dark and light mode.
The actual dark/light skinning is done like this in CSS:
:root {
	--bg-color: #ffffff;
	--text-color: #223;
	--contents-bg: #333;
	--contents-code-bg: #454545;
	/* etc */
}

:root.dark {
	--bg-color: #1b1b1b;
	--text-color: #fff;
	--contents-bg: #050505;
	--contents-code-bg: #242424;
	/* etc */
}
Where those variables can be used in the rest of the CSS file:
body {
	background-color: var(--bg-color);
}
Just add or remove the dark class from the documentElement (see toggle_dark above) to enable/disable dark mode.
I could also have added a cookie that remembers the choice, but cookie laws got me anxious. So I just added the ?light and ?dark URL things instead.
Choosing a target audience
At first I tried to make the book a bit more targeted at programming beginners. This quite quickly made my text harder to read for people who know some programming, but want a book on Odin. I tried a few different approaches. What I settled on was:
- Book is for people with basic programming skills.
- They don’t need to know low-level programming, so coming from something like Python should be OK.
- If they do know C or C++ from before, then there will be extra goodies in special side bubbles.
The trickiest thing to write about was manual memory management. I to make a book that’s useful for people coming from automatically memory managed languages. They can learn how to manage memory in Odin, but also learn some fundamental ideas that may be transferable to other languages.
In a sense, the early chapters of the book became a mixture of teaching Odin fundamentals and also prepping people for understanding manual memory management.
What to include?
Early on I made a big TODO of chapters I wanted, without having any big plan. I wrote and wrote. I rewrote lots of things several times. The manual memory management chapters took weeks or months of re-writing to get into their final shape.
At some point you must decide on what the book is going to contain. For me, the most important thing was that people understand the fundamentals, understand manual memory management and get a good intuition for the language. If I didn’t go over some power-user features, then that was fine. However, near the end I added a “Things I didn’t mention” chapter where I just wrote a few lines of the stuff I didn’t include, with links to where you can read more.
I renamed that chapter to “A few more things…” in the latest version, because it started feeling like a “stuff that didn’t fit anywhere else” chapter. So there are actually some slightly longer sections in there now, but also some quick mentions.
Proof reading
I want to thank my proof readers Tobias Möllstam, PythagoRascal, Bill Hall (gingerBill) and Geraldine Lee. They read the book and gave lots of useful comments!
Editing
I also proof read my own book. Probably at least 5 times. It’s not a short book! But it was necessary. I found so many errors.
The last month or so consisted of me reading the book over and over. Fixing things. Sometimes I reworked whole chapters because something was off.
If you are proofing and editing your own book, then make sure you take a few days between read-throughs. And also try to read in different formats each time. That way you trick your brain into seeing things in a new light.
A few days ago I released an update to the book: https://zylinski.itch.io/odinbook/devlog/869457/version-15-the-biggest-update-so-far For that update I actually did a whole extra proof reading pass! I read the whole book and fixed a bunch of errors. Since I hadn’t looked at the book for a few weeks, it truly made me read things in a different light. I fixed many things that were slightly unclear. Things that I couldn’t see before, because I was so blind to my own work.
Illustrations
I drew all the illustrations using a Wacom Intuous M tablet and Affinity Photo 2. However, I added many illustrations quite late. I think it’s important to first make sure the text is good, and then when you really feel like the text is still lacking, then you add illustrations. It’s easy to put in illustrations very early and make the text impossible to read without constantly looking at the illustrations. “We see in illustration B that there is an arrow that points to blabla and that means that the thing in illustration C is false…” bla bla bla. I don’t like that. I want the text to be as good as it can, with the illustrations acting as an emergency backup.
How long did it take?
The book took almost 7 months of full-time work to write. However, that’s not the full picture. I could not have written it without:
- Spending years using the language
- Making a large number of YouTube videos on the language
- Writing tutorials on the language
- Answering lots of questions on the Odin Discord and seeing what it is people don’t understand combined with understanding how you explain it to them. It’s not just about giving an explanation, it’s about giving it in the right way.
- Experience in writing fiction. This will make you write more human and understandable text.
In a sense the book is more like a summary of information that I collected over several years, carefully assembled.
EPUB
I also wanted to put the book on Amazon and Google Books. The HTML version is The Premium Reading Experience. But I can’t put that on an eReader (Amazon Kindle, Kobo etc) or in the Google Books store. So I needed to construct an EPUB version.
Bob Nystrom wrote a bit about how annoying EPUB is. I recommend that you read his blog for information about that. Here I give some additional information and tricks.
EPUB zipping madness
Bob wrote in his blog post that an EPUB is basically a zip. He wrote that you can run the following to make the zip:
cd my_awesome_site
zip -X0 my_awesome_site.epub mimetype
zip -Xur9D my_awesome_site.epub *
One VERY STRANGE THING about EPUB is that it’s important that the mimetype file is added first. Why? Because the EPUB format goes in and looks for it at the start of the zip. It needs it to be first as some kind of “header”. Absolutely bonkers.
What goes into the EPUB?
I recommend that you go to gutenberg.org and download yourself some public domain EPUB, unzip it and study it. I used Frankenstein: https://www.gutenberg.org/ebooks/84
For the longest time, my book had the Frankenstein cover…
EPUB and XHTML
While the HTML version of the book uses normal HTML, EPUB requires XHTML. XHTML was the standard HTML for a few years, until someone decided it was a mistake.
One thing about XHTML is that it needs a / at the end of tags that don’t have a closing tag:
HTML:
<img src="hello.jpg">
XHTML
<img src="hello.jpg"/>
So I made a small single_element procedure. Just before putting these “non-closed” tags into the HTML, I run them through single_element. If the EPUB flag is active, then it finds the closing > and replaces it with />.
This way, I could mostly use the same code.
The EPUB is constructed in a such different way that I don’t use the header.html and footer.html from the HTML version, I made them custom for the EPUB.
Minimal EPUB styling
The same program that generates the HTML version generates the EPUB version. However, it uses a completely separate CSS file. An EPUB should have as little styling as possible, so the user can configure their reading experience through their eReader.
Don’t bundle the base64 encoded fonts into EPUB
When I first tried to open my book on a real Kindle, it took like 2 minutes to load. Through trial and error, I figured out that it was because I had bundled the base64 encoded fonts. I didn’t need the fonts, I had just forgotten to remove the CSS file that contained them. Don’t do that. The eReader will decide on fonts itself. You really have to “let go of control” on eReaders. Just make sure the book looks OK on the popular eReaders and EPUB reading apps, and make minimal CSS changes to fix anything that is wrong.
The future
I still haven’t decided on if I want to make a physical book. I would have to do a lot of extra work to get that done. Physical books need to be manually typeset to look good. That means putting the text in and then going over every page and making sure everything is in the right place and looking tidy. It’s much more than just PDF-printing the HTML or EPUB version.
Thanks for reading
Check out the book at https://odinbook.com/
Got a question? Join my Discord: https://discord.gg/4FsHgtBmFK
Have a nice day! /Karl Zylinski