
Preface
NOTE: I have created a whole book, loosely based on this article! You can read more about it at odinbook.com. For comparison: This article contains 12400 words, the book contains 76000 words.
This article is an introduction to the Odin Programming Language. It is aimed at people who know a bit of programming, but have never touched Odin. It is not a reference guide, rather I try to keep things informal and talk about what I think are important aspects of the language. There will be some notes on differences to C/C++, as Odin in many ways tries to be better C. If you enjoy this article and want to support me, then you can do so by becoming a patron.
In the recent years most of my programming has been done using the Odin Programming Language, sometimes referred to as Odinlang. Since a year back I create my own video games using Odin. You can find my game CAT & ONION on Steam, it is completely created in Odin.
Why Odin? I come from having worked on video game engines where I programmed a lot in C++ and C. While those languages are very powerful, they are also very old and have a lot of baggage. Odin strives to be a modern alternative to C. It doesn’t try to fundamentally solve any new problems. It is not a Big Agenda language, meaning that it doesn’t try to enforce a new way of programming onto you.
What’s so great about is that when I first started programming Odin it felt like it point-for-point fixed many of the issues I had with C. Instead of listing those issues here, I will point out those differences throughout this article.
Another reason for “Why Odin?” is that I prefer programming languages that fulfill these three properties:
- Compiled (not interpreted)
- Manual memory management
- Statically typed
Many new languages fail on one of these points, so I end up not liking them. However, the last few years there has emerged some languages that fit into this description, such as Odin and Zig. If you want to use one of Odin or Zig but don’t know which one, then I recommend spending 1-2 weeks using each and then make up your own mind.
A note on learning Odin
While Odin is a great language, it is currently quite lacking in documentation. There is lots of documentation, but it is scattered and incomplete. I tried to address that by writing this article, which I hope gives a holistic introduction to the language. This article aside, here is my recommendation of where to look if you are stuck on trying to figure out how to do something specific in Odin. I recommend you check these resources in the order stated:
- Check the overview. The overview is not complete, but searching around in there will answer many beginner questions.
- Look inside demo.odin. It is an example that comes with the compiler that tries to showcase many different features of the language.
- Search in the core library. I.e. pull
<odin_compiler_dir>/coreinto your text editor and just search around in there. The core library is well written and easy to read, it is a great way to learn many Odin concepts. - Ask in the #beginners channel on the Odin Discord server. The server has thousands of members and many questions get answered very quickly.
Installing Odin
I will not go over in detail how to install Odin. You can read about that on the Getting Started page. If you still have trouble, then I have a video on how to setup Odin from source:
Basic “Hello World”
Here is a tiny Hello World program written in Odin:
package hello_world

import "core:fmt"

main :: proc() {
	fmt.println("Hello World!")
}
Functions are in Odin referred to as procedures. main is the default entry point for the program. We see that procedures are created by typing procedure_name :: proc() {}
The line import "core:fmt" fetches the fmt package from the standard library. fmt contains procedures that can print to the console and also format strings. All those things inside the fmt package can then be used by typing fmt.some_procedure_name(). Inside the main proc we use the fmt.println proc to print “Hello World” to the console.
Semicolons are not needed, and I would encourage to simply not use them. Not using semicolons fits well with how Odin looks. But you can still use them if you really want to! There is also a compiler flag to make it an error if you put in unnecessary semicolons (-vet-semicolon)
If you copy-paste the code above into a file and save that file inside a new folder, then you can run the program by navigating to that folder using the command prompt and running: odin run .
. refers to the current directory. This means that it will take all the things in the current directory and compile them as a single package, output an executable and run it.
I will say more about the package system later, but for now I just want to point out that the line package hello_world must be the same for all odin files within a folder.
The reason for saying procedure, or proc, instead of function is that the word function, if one wants to be nit-picky, is a bunch of code that has no side effects. This is why when we talk about “functional programming” we mean code that composes new functionality from combining functions, where those functions do not modify any global state. Now, functions can be seen as a special case of procedures. I.e. a procedure can take some parameters, return some values and also have side-effects on global variables, while functions can do the same except for that they have no side-effects. Some languages refer to side-effect free procedures as “pure functions”.
Variables and constants
You can create a variable like this:
number: int
This creates a variable of type integer, but it does not give it any value. In Odin if you do not give it any value, then it will be initialized to zero.
In C and C++ if you write
int number;then the variable will not be initialized and can contain garbage memory, which is almost never what you want. In Odin, if you for some reason want to leave a variable completely uninitialized, then you can writenumber: int = ---. However, in almost all cases you will want zero initialization. In some performance sensitive algorithms you may want to skip it, but I have never had to do so.
You can assign a value to an already existing variable like this:
number: int
number = 7
Note that trying to do
number = 7when there is no pre-existing variable callednumberwill fail to compile.=is for assignment,:is for creating new variables.
Now, if you want to both create and assign a variable on one line, then you can combine the : and the =, like this:
number := 7
In this case you also didn’t have to say what type number should have. We say that the type was inferred from the value on the right hand side. In this case it is inferred to int. You can still give it a specific type if you so wish:
decimal_number: f32 = 7
Note how this looks like the first example number: int, but we’ve changed the type and added = 7 at the end. The type this time is f32, which is a 32 bit decimal number. Since a decimal number can also be 7, this code works OK.
Another way to write the previous example is like this:
decimal_number := f32(7)
Here we cast the 7 to an f32, which means that the type of decimal_number will be inferred to f32. What is it that decides that 7 is inferred to int by default? To answer that, let’s talk a bit about constants.
Constants are things that only exist at compile-time. Since they only exist at compile-time, they cannot be changed. You create a new constant like this:
CONSTANT_NUMBER :: 12
Note that we use :: to declare constants. You can assign a constant to a variable like this:
CONSTANT_NUMBER :: 12
number := CONSTANT_NUMBER
Just like before, the type of number will be inferred to int. The two lines above are actually identical to just typing number := 12. You can think of constants as just being “copy-pasted” into where-ever you type their name. This means that you can also think of 12 as just being a nameless constant.
However, constants have a kind of type associated with them, it’s just not as strong a type as variables. In this case the type of CONSTANT_NUMBER is “untyped integer”. An untyped integer can be assigned to any integer or floating point variable as long as that variable can “accommodate” it. Here’s something that will not compile:
BIG_CONSTANT_NUMBER :: 123455678
small_number: i8 = BIG_CONSTANT_NUMBER
This will not compile. small_number is an 8 bit integer, the biggest value it can hold is 127. BIG_CONSTANT_NUMBER is a constant of type “untyped integer”. So when the compiler tries to shove it into small_number it sees that the value of this constant is bigger than 127, so it refuses to do so.
Similarly, this will not compile:
DECIMAL_CONSTANT :: 27.12
my_integer: int = DECIMAL_CONSTANT
Here DECIMAL_CONSTANT has the type “untyped float”, since it has some decimals. The compiler will refuse to set an integer to such a value. So as you’ve seen “untyped integers” can be put into float variables, but “untyped floats” cannot be put into integer variables, which hopefully makes sense.
Casting DECIMAL_CONSTANT to an int won’t work either:
DECIMAL_CONSTANT :: 27.12
my_integer := int(DECIMAL_CONSTANT)
This, however, will compile:
DECIMAL_CONSTANT :: 27.12
my_float := DECIMAL_CONSTANT
my_integer := int(my_float)
This works because the constant 27.12 can be put into a float variable, and a float variable can be cast to an int. However, when we do the final cast to int, then the value will be truncated to just 27. The reason you can’t do my_integer := int(DECIMAL_CONSTANT) is because it is a strange thing to do. It’s like saying my_integer := int(27.12). Why would you want to do that?
Finally, if you really want to, you can give constants a specific type:
DECIMAL_CONSTANT : f32 : 7
So now whenever you try to assign this constant to a variable, you can only do so if that variable is of type f32. You can still cast the constant to other types.
Compare the line above to that of creating and assign a variable:
decimal_variable: f32 = 7
in both cases the type comes after the first :, and then you put a : or a = after the type depending on if you want a constant or a variable. And in most cases you can skip the type completely and let the compiler infer it for you.
In C you have to type
0.5fall the time to denote a 32 bit floating point value (note thef). Typing0.5in C will get you a double precision (64 bit) floating point number. Trying to assign0.5to a 32 bit float in C is a compilation error. The constant system in Odin is a bit more comfy. In Odin the compiler will still emit an error if the constant won’t fit into the type, such as trying to shove a giant integer into an 8 bit integer type, but you don’t have to worry about the specific types of constants as much. In the case of0.5, it is a valid value to assign to both af32and anf64.
Loops
Here is some code that creates a variable counter and then loops until counter hits the value 20, printing its value each lap of the loop:
counter: int

for counter < 20 {
	fmt.printfln("Counter value: %v", counter)
	counter += 1
}
All for and while loops you find in C/C++ are possible using the for loops in Odin:
for {}is a loop that runs forever, equivalent towhile true {}in C.for i < 10 {}is a loop that runs for as long as i is less than 10, equivalent towhile i < 10 {}in C.for i in 0..<10 {}is a loop that creates a value i and sets it to 0 and then increases it by 1 until it reaches 10. Equivalent tofor int = 0; i < 10; i += 1 {}in C.for i := 0; i < 10; i += 1 {}is a standard for loop. Note that Odin does not support the ++ operator, so you have to write += 1.for item in array_of_items {}is a “for each” loop that goes over an array and presents you with each item in the array. Similar tofor (auto& item : array_of_items) {}in C++for item, index in array_of_items {}same as the previous one, but gives also gives you access to the index of the current item.for &item in array_of_items {}similar to the previous one, but note the&. This ampersand makesitempossible to modify.
Using break and continue you can stop loops and skip a lap of a loop, respectively:
i := 0

for {
	if i > 2000 {
		// stops this otherwise infinite loop
		break
	}

	i += 1
}
for i in 0..<10 {
	if i == 5 {
		// skips printing "5"
		continue
	}
	fmt.println(i)
}

// will print 0 1 2 3 4 6 7 8 9
Procedure parameters and return values
Procedures can have parameters and return multiple values:
my_proc :: proc(number: int, text: string) -> (int, bool) {
	fmt.printfln("This is the number: %v, this is the text: %v", number, text)
	return len(text), true
}

some_int, some_bool := my_proc(5, "Interesting text")
We see here that my_proc is a procedure that takes 2 parameters and returns 2 values. The return values can be assigned to new variables.
If you do not want one of the returned values, then you can use _ to say “I don’t care about that one”: some_int, _ := my_proc(5, "More text")
If statements
If statements are created like so:
if some_variable == 7 {
	// do stuff
}
There’s no need for a parenthesis around the condition of the if-statement. As expected you can create else if and else branches:
if some_variable == 7 {
	// do stuff
} else if some_variable == 10 {
	// do other stuff
} else {
	// do fallback stuff
}
If statements without curly braces are not allowed. I.e. this is will not compile:
if some_variable == 7
	some_proc()
however, you can do
if some_variable == 7 do some_proc()
I tend to just write the full three lines style:
if some_variable == 7 {
	// do stuff
}
Some people like putting the { on a new line. If you do that then perhaps the if X do stuff() syntax is more useful. But I’m just gonna recommend keeping the { on the same line, because it plays nicer with Odin’s lack of semicolons.
There is also a slightly different, but very useful syntax for if statements. Say that you use os.read_entire_file (you’ll find this proc in core:os). This proc returns two values, the data of the read file and also a bool if it was able actually read the file. What you can do is this:
if data, ok := os.read_entire_file("my_file"); ok {
	// do stuff using data
}
Here we first initialize data and ok, but the stuff after the ; is the actual condition that the if statement should check. So if ok is true, then you can be sure that data is safe to use within the scope of the if statement.
Array basics, swizzling and array programming
Say that you want to represent a position in 3D space (I make video games, so this example comes naturally to me), then you can do so using three numbers:
position: [3]f32
This creates a variable position that is an array of three f32 numbers.
You can fetch the different values from position like so: position[0]. However, when arrays have 4 or fewer items, then you can index them using x, y, z and w as well. So instead of position[0] you can write position.x.
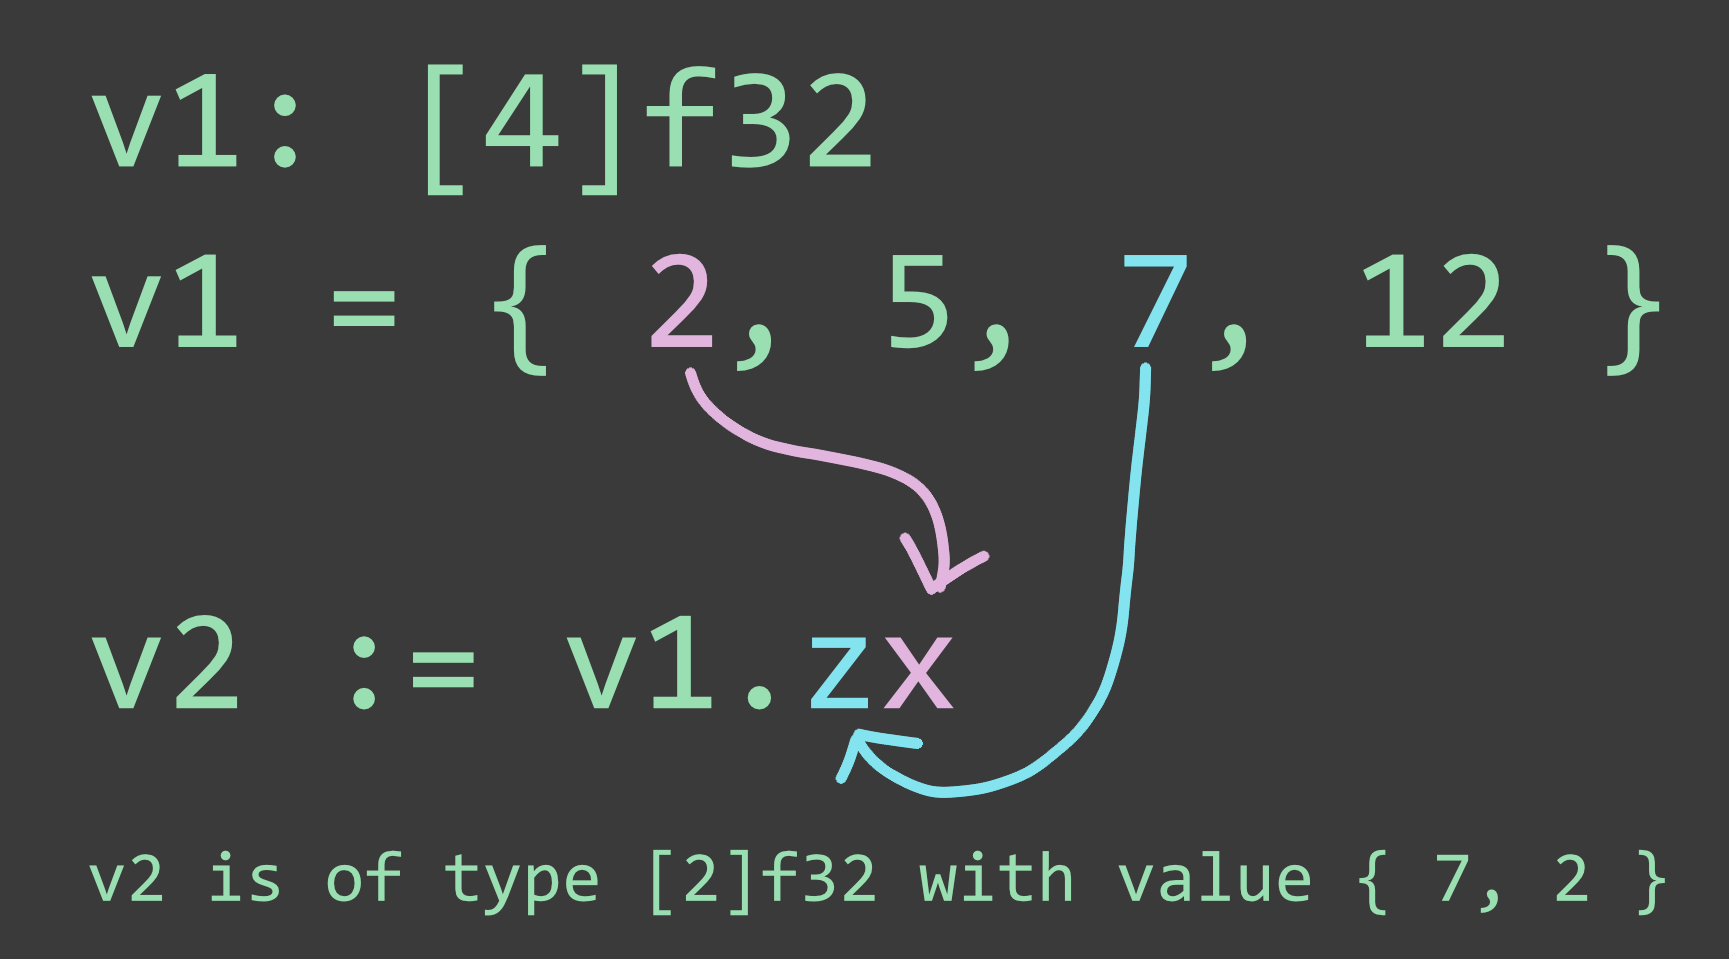
You can also swizzle such arrays: 2d_pos := position.xy will make 2d_pos into a variable of type [2]f32 that contains the x and y parts of the position. You can also do stuff like position.xxyy or position.zyx. Finally, because in some applications we use 4 dimensional numbers to represent colors, you can also swizzle using .rgba.
If you don’t wanna write [3]f32 all the time then you can make an new type instead:
Vector3 :: [3]f32
You can add arrays that have matching item type and size, like so:
Vector3 :: [3]f32
position: Vector3
velocity := Vector3 { 0, 0, 10 }
position += velocity
This is known as ‘array programming’. You can add arrays, subtract them and multiply them with scalars. Odin does not have operator overloading, but one of the most common use cases for operator overloading is doing vector maths. So I haven’t missed operator overloading at all because of how great array programming works.
Things like this is a great example of why I enjoy Odin so much for video games programming.
You can of course create bigger arrays. Also, later I will talk about two concepts closely related to arrays: dynamic arrays and slices.
Structs
You can group variables by using structs, defining a struct creates a new type that you can later use.
Player :: struct {
	position: Vector3,
	health: int,
}
The struct is created by doing Struct_Name :: struct {}. Here we see the double colon (::) again. So far we have seen three different things use the :: syntax: procedures, constants and now struct definitions. All these three things are known at compile-time, so you can see the :: as something that creates things that are possible to reason about at compile-time.
The struct has a number of fields, each field looks like a variable declaration, but with a comma at the end.
In C/C++ I used to have a coding standard to always put a comma even at the last field of a struct. That way, when adding a new field, you didn’t forget the comma on the previous line, saving you that compile error. With this in mind, in Odin commas are enforced, even for the last line.
We can create a variable using our struct type like so:
player: Player
The health and the position fields inside this player struct will be all default initialized to zero.
There are no classes in Odin, only structs. Structs can only contain fields, there are no “methods”. This is in line with Odin trying to be a better C, and just like in C there are no methods. You write your programs mostly using procedures, structs and arrays.
If you want to initialize the player struct when you create it, then you can do like this:
player := Player {
	health = 100,
}
This player will then have the health field set to 100. Any field not mentioned will be zero-initialized. In this case the position will be all zeroes.
These initializers where you mention fields by names are known in C as designated initializers. They are one of my favorite features in C due to it being possible to mention only some fields and the non-mentioned will be zeroed. Unfortunately, in C++ they have only recently been added, so you can’t really use them yet. It was always an annoying trade-off when writing C++ code, that I could not use the designated initializers.
We could also have written
player: Player = { blabla
But doing player := Player { whenever possible is usually considered more idiomatic Odin.
You can replace the value of a whole struct like so:
player := Player {
	health = 100
}

// a bit later

player = {
	health = 7000
}
Enums and switch
Enums stand for “enumeration” and are used to attach names to a series of increasing numbers.
Create an enum like so:
Computer_Type :: enum {
	Laptop, // has value 0
	Desktop, // has value 1
	Mainframe, // has value 2
}
You can then create a variable of this enum type:
ct: Computer_Type
The first item in the enum will be associated with the zero value. Since we are not giving this variable any value it will be zero initialized. So it will have the value 0, equivalent to the enum value Laptop.
You can modify the value of the enum like this:
ct = .Mainframe
You can also write the full Computer_Type.Mainframe if you want to, but since the compiler knows the type of ct, you just have to write the name of the variant you want, with a period in front.
You can use a switch statement to branch on the type of the enum:
switch ct {
	case .Laptop:

	case .Desktop:

	case .Mainframe:
}
In C you have to write
break;after each case in a switch. In Odin you do not need to do that. Instead, if you want a case to fallthrough to the next case, then you writefallthrough
A switch must list all the variants. If you want to skip some variants then put #partial in front of switch.
By default enums use int as the ‘backing type’. You can override this by typing
My_Enum :: enum u8 {
	Cat,
	House,
}
Where this enum will use an unsigned 8 bit integer as backing type instead.
Unions
A union is an object that can hold one value at a time, but the value it holds can be of different types depending on what you currently need.
Value :: union {
	int,
	f32,
	Person_Data,
}

Person_Data :: struct {
	name: string,
	age: int,
}

val: Value = f32(12)
val will now be holding a f32, but it could just as well be an int or a struct object of type Person_Data. We call these different values the variants of the union. The Value type will only take as much memory as the biggest variant.
You can check if it holds a variant of a specific type like so:
if f32_val, ok := val.(f32); ok {
	// use the value of type f32 that the union held
}
You can also just do f32_val := val.(f32), but if it isn’t currently an f32 then your program will assert (crash with error).
You can also use a special switch statement to check the current type:
switch v in val {
	case int:
		// you can use v, it is of type int

	case f32:
		// you can use v, it is of type f32

	case Person_Data:
		// you can use v, it is of type Person_Data
}
Note the difference between the switch for enums and the one above. For enums you did
switch your_enum {
	case .Enum_Value:
}
while for unions you do:
switch v in your_union {
	case Some_Union_Variant_Type:
		// v is of type Some_Union_Variant_Type

	case Some_Other_Variant_Union_Type:
		// v is of type Some_Other_Variant_Union_Type
}
The difference is that we must say v in, where v is the variable name we can use to access the data the currently set variant holds.
I have an old video on how I used Odin’s unions to create state machines in my game:
Pointers and passing proc parameters by pointer/value/reference
Sometimes you want to make procedures modify a value for you. You can do that by passing a pointer to the procedure:
my_number := 7

increase_number :: proc(n: ^int, amount: int) {
	n^ += amount
}

increase_number(&my_number, 3)

// my_number is now 10
Here we are passing a pointer to my_number into the proc increase_number so that the proc can alter it. The ^ in front of ^int means that we want a “pointer to an integer”. We get a pointer to something by taking the address of it, using the & operator.
Within the proc you can add amount to the variable that the pointer points to by putting a ^ on the right side of n, as we see in the n^ += amount line. This can be compared to writing *n += amount in C.
You can also pass structs by pointer and modify its fields:
Player :: struct {
	position: Vector3,
	health: int,
}

damage_player :: proc(player: ^Player, amount: int) {
	player.health -= amount
}

player := Player {
	health = 100,
}

damage_player(&player, 10)

// player.health is now 90
Unlike C/C++, you do not need to use the -> to fetch fields of the pointed-to-struct. You can just use . directly.
Now, say that we want to pass this player struct to a proc, but the proc won’t modify the player, so we do not want to pass it by pointer. How would that look? Like this:
Player :: struct {
	position: Vector3,
	health: int,
}

Box :: struct {
	position: Vector3,
	size: Vector3,
}

player_collider :: proc(player: Player) -> Box {
	return {
		position = player.position,
		size = { 0.3, 1.6, 0.3 },
	}
}

player := Player {
	health = 100,
}

collider := player_collider(player)

// use collider for something
Here we take the player and return a new struct that tells us how ‘big’ the player is by combining the position of it and a size.
But now those who come from C/C++ might say: Hang on! Doesn’t this copy the whole player struct each time you call player_collider(player), since you do not pass it by pointer?
The answer is no, as long as the player struct is larger than pointer size (8 bytes on 64 bit machines), it will automatically be passed as an immutable reference. This means that from within player_collider the parameter player is the exact same memory as the player variable we passed in. But since it is immutable you cannot change it, trying to alter any of the fields of player is a compilation error.
If you come from C++ you probably do a lot of
const Player& playerin order to pass things by immutable (const) reference. In Odin you simply pass by value/reference (depending on size), or by pointer (if you want the proc to be able to modify the parameter).
Actually, all proc parameters in Odin are always immutable:
wont_compile :: proc(number: int) -> int {
	number += 5
	return number
}
This proc won’t compile. All proc parameters being immutable makes it possible for the compiler to do optimizations such as the pass-by-reference-automatically.
If you want a local, mutable copy, then you can do:
wont_compile :: proc(number: int) -> int {
	number := number
	number += 5
	return number
}
As you see we define a new variable called number, even though the proc parameter number already exists. This is allowed for proc parameters in order to create mutable copies without having to come up with new names for them.
Dynamic arrays
If you want an array that can grow and shrink while your program runs, then you can use a dynamic array.
Create it like so:
dyn_arr: [dynamic]int
Add things to it like so:
append(&dyn_arr, 5)
Remove things like so:
unordered_remove(&dyn_arr, some_index)
// if you care about the order of things (slower):
ordered_remove(&dyn_arr, some_index)
The line dyn_arr: [dynamic]int will not allocate any memory. However, when you append stuff to an empty dynamic array, then it will need to grow. The program will then use an allocator to allocate memory. More about that in a bit.
What is a dynamic array internally? It’s essentially a struct that stores these fields:
data:      rawptr,
len:       int,
cap:       int,
allocator: Allocator,
It also remembers what type the items of the dynamic array should be. So when you write dyn_arr: [dynamic]int then the data, len, cap and allocator will all be default initialized to zero. Later, when append is run, it sees that data is 0 (or nil, which is the zero value for pointers). It will therefore try to allocate some initial memory for the array. It will check if the allocator field is set and use that allocator to allocate the memory. But in the dyn_arr: [dynamic]int example, the allocator will be zeroed, so it will instead fall back to using context.allocator and also record that allocator into the allocator field, which will then be used in future calls to append.
If you want to use some other allocator for your dynamic array, then you can create the dynamic array like this instead:
dyn_arr := make([dynamic]int, my_allocator)
This will create a dynamic array that is all zeroed, expect that the allocator field will be set to my_allocator.
If you have some proc that creates and returns a dynamic array, then you could make that proc use a custom allocator for the dynamic array like this:
figure_out_stuff :: proc() -> [dynamic]int {
	res: [dynamic]int
	append(&res, 5)
	return res
}

context.allocator = my_allocator
numbers := figure_out_stuff()

// numbers will be allocated using my_allocator
More about this context stuff soon, but for now we can just note that the figure_out_stuff() proc will use the allocator you set on the context.
To free the memory of the dynamic array, write:
delete(dyn_arr)
You can also clear it, which just sets the len inside the dynamic array to 0:
clear(&dyn_arr)
Note that delete takes a value and clear takes a pointer. This is because clear needs to modify a field (it sets len to 0), while delete will only tell the allocator to free memory, but it won’t directly modify any of the dynamic array’s fields. It just needs the value of the data: rawptr field.
Slices: A window into a part of an array
Say that a fixed array of integers is created like so:
my_numbers: [128]int
Now, if you just want a part of my_numbers, say that you only want the first 20 items, then you can fetch those using a slice:
my_numbers: [128]int
first_20 := my_numbers[0:20]
A slice is a ‘window’ that looks at a part of an array. Slices are essentially pointers plus a length, where the pointer says where the slice starts. Creating a slice does not allocate any memory, it uses the same memory as the thing you sliced, but looks into just a part of it. We create a slice using the [:] operator, where you put in the indices you want it to span like this: [start_index:end_index]

You can also skip some of the indices:
last_20 := my_numbers[30:]
In this case we create a slice that runs from index 30 to the last index. Skipping the first index would make it run from index 0. If you skip both indices then you get a slice that looks at the whole thing. This is useful when you have a proc that expects a slice, but you have a fixed size array or dynamic array.
In C if you run out of bounds, i.e. using indices that are bigger than the length of the array, your program may continue outside it and start trashing memory. Odin has built in bounds checking of arrays, slices and dynamic arrays. So you get a nice assert immediately when you go out of bounds. This bounds checking does have a slight performance impact, so for for release/production builds you can choose to disable bounds checking using the compiler flag
-no-bounds-check. I’d say disabling it in release builds is fine, because you’ll probably catch most of those out-of-bounds errors while testing your development build anyways.
If you want the slice to have its own memory, then you can import the package "core:slice" and run slice.clone(some_slice), which will then be cloned using the allocator context.allocator. You can also write slice.clone(some_slice, another_allocator) to force the clone to happen with an allocator of your choice.
It is also possible to create a slice from scratch and make it have it’s own memory:
ints := make([]int, 4096)
This slice does not then really “look into” any other array, it has its own original memory!
As an example, say that you want to consider just a part of an array. Say that you only want to display 10 numbers at a time from a bigger list of numbers. You could do this using slices:
display_numbers :: proc(numbers: []int) {
	fmt.println(numbers)
}

my_numbers: [128]int

// Add some code here to fill my_numbers
// with interesting numbers.

// Process 10 numbers at a time and send
// them off to display_numbers using slicing.
for i := 0; i < len(my_numbers); i += 10 {
	display_numbers(my_numbers[i:min(i+10, len(my_numbers))])
}
Slices can be formed from different kinds from arrays, other slices and also dynamic arrays.
This means that you can do this:
my_numbers: [128]int
first_20 := my_numbers[0:20]
last_10_of_first_20 := first_20[10:]
That is, I created a second slice from my first slice.
You can slice dynamic arrays in the same way:
a_dynamic_array: [dynamic]int

for i in 0..<100 {
	append(&a_dynamic_array, i)
}

first_50 := a_dynamic_array[:50]
A good idea is to make all procedures use slices as much as possible. Since you can form a slice from all the other types of containers almost for free (remember: making a slice does not allocate memory, it’s just a pointer an a length). There’s no point in feeding a proc a dynamic array unless you actually want to modify the dynamic array. If you just wanna use the data in it, then feed it a slice, even if it as slice that looks at the whole dynamic array.
Enumerated arrays
You can create arrays that map nicely to an enum and that always has the same number of fields as an enum:
Nice_People :: enum {
	Bob,
	Klucke,
	Tim,
}

nice_rating := [Nice_People]int {
	.Bob = 5,
	.Klucke = 7,
	.Tim = 3,
}

bobs_niceness := nice_rating[.Bob]
You can also skip initializing it, then it will still have the same number of items as the enum, but all will be zeroed:
nice_rating: [Nice_People]int
Finally, you can do a partial initialization, all non-mentioned variants will be zero:
nice_rating := #partial [Nice_People]int {
	.Klucke = 10,
}
defer: Making things happen at end of scope
Sometimes you want code to be run at the end of the current scope. For example, perhaps you have a proc that loads an image, does some processing of it and outputs a new image based on that (here I use some procs from raylib, but just imagine that they are any procs that load/unload images):
import rl "vendor:raylib"

process_image :: proc(filename: cstring) -> rl.Image {
	to_process := rl.LoadImage(filename)
	defer rl.UnloadImage(to_process)

	result: rl.Image
	/*
		Here goes some code that creates the 'result'
		image based on to_process.
	*/

	return result
} // <-- rl.UnloadImage(to_process) happens here.
Here rl.LoadImage load the image to process from disk. Immediately after that line we see defer rl.UnloadImage(to_process). The defer will make this line run at the end of the current scope, in this case at the end of the process_image procedure. This way we can group the code for loading and unloading the image. This can be useful in cases where there is a lot of code between the line where you load the image and the line where you unload it.
Another good example, from the overview, is to defer the closing of a file handle.
f, err := os.open("my_file.txt")
if err != os.ERROR_NONE {
	// handle error
}
defer os.close(f)
// rest of code
A few words on the the word ‘scope’: The current scope does not always end at the end of the current procedure. You can for example make scopes within a proc like this:
print_with_defer :: proc() {
	{
		defer fmt.println("this prints at next }")
		fmt.println("this prints first")
	}

	fmt.println("this prints last")
}
This program outputs:
this prints first
this prints at next }
this prints last
So in this case, the defer happened at the end of the scope defined by the pair of {}, not at the end of the proc. Such a pair of curly braces without any if, proc or loop or anything I usually call an “anonymous scope”.
when: Compile-time check to enable/disable code
Sometimes you don’t want some code to be included in the program at all unless a certain constant is set. For example maybe you have a game with a “level editor” that should only be included in some special development builds:
HAS_LEVEL_EDITOR :: true

update_game :: proc() {
	when HAS_LEVEL_EDITOR {
		// add level editor specific code
	}
}
when can only act on compile-time values. In this case we are checking a constant. If the constant is false then the code wouldn’t even be part of the program.
To make when more useful, you can combine it with configurable flags:
HAS_LEVEL_EDITOR :: #config(EDITOR, true)
Now you can run the compiler like so: odin run . -define:EDITOR=false in order to set the value of this constant to true/false. Note that #config accepts a default value as second parameter.
Implicit context and custom allocators
So we’ve seen the word context a lot. I wrote context.allocator a bunch of times. All procedures in Odin get fed the current context. It is an extra parameter that is always passed along.
The context is a struct that looks like this (see <odin_compiler_dir>/base/runtime/core.odin)
Context :: struct {
	allocator:              Allocator,
	temp_allocator:         Allocator,
	assertion_failure_proc: Assertion_Failure_Proc,
	logger:                 Logger,

	user_ptr:   rawptr,
	user_index: int,

	// Internal use only
	_internal: rawptr,
}
Two commonly used fields of it is allocator and temp_allocator.
If you don’t want a proc to be fed the context you can write
some_proc :: proc "contextless" () {}. For some super-often run procs it can be a slight optimization. But I would never worry about this unless you are writing low level maths code or similar.
So if you have a proc that allocates memory using context.allocator (which is the default when you don’t specify an allocator), then you can change the context.allocator field before calling it in order to control what allocator it should use. In code:
do_work :: proc() {
	make_lots_of_ints :: proc() -> []int {
		ints := make([]int, 4096)

		// init ints however you need
		ints[5] = 7

		return ints
	}

	context.allocator = my_allocator
	my_ints := make_lots_of_ints()
	// my_ints will be allocated using my_allocator

	// to free this memory, use:
	delete(my_ints)
}
make will allocate memory using context.allocator. If you look at the definition of make (see <odin_compiler_dir>/base/runtime/core_builtin.odin), you’ll see that it takes an allocator parameter that has the default value context.allocator.
This means that you can also force make to use a specific allocator: ints := make([]int, 4096, my_allocator). I would say that it is better to feed procs a specific allocator than to override context.allocator whenever possible, as it is more explicit.
At the end of the scope the context will be re-set to whatever value it had before the scope started. Note that these scopes are not just the procedure’s scopes, but can be any scope, like so:
some_proc :: proc() {
	// start anonymous scope
	{
		context.allocator = my_allocator
		my_ints := make_lots_of_ints()
	}

	// context will now be the same as
	// before the scope above started.
}
Note that delete() is used to free the memory of slices and dynamic arrays alike. For slices it will use context.allocator (you can also send in a second parameter that to use a specific allocator). But for dynamic arrays the the dynamic array itself remembers which allocator is used, since it needs to be able to grow when you run append. So for dynamic arrays it does not care about the value of context.allocator when running delete.
Parametric polymorphism: Reusable, generic procedures
We’ve already seen how we can make arrays that contain items of any type. But how can we make code that can operate on any type?
In Odin we can do this using parametric polymorphism. This means that we can make parameters of procedures generic.
Say that we have this procedure that implements clamp (Odin has clamp built in, this is just for the sake of an example):
clamp :: proc(val, min, max: f32) -> f32 {
	if val <= min {
		return min
	}

	if val >= max {
		return max
	}

	return val
}
Now, we may want to clamp integers or 64 bit floats as well. We can make our clamp proc generic like this:
clamp :: proc(val, min, max: $T) -> T {
	if val <= min {
		return min
	}

	if val >= max {
		return max
	}

	return val
}
The f32 in the list of parameters has been replaced with a $T. This means that the type of val, min and max (they all have to be the same type) will be usable by typing T. As you can see we use T as the type of the return value of the proc.
This proc can now be used for any numeric type. The compiler will generate the different variations for you as you use clamp with different types of parameters. If it is not possible to generate the code, then you’ll get a compilation error, which would happen if you tried to use this proc with a non-numeric type.
To completely disallow this proc to be used for non-numeric types, you can alter the declaration of clamp this like:
clamp :: proc(val, min, max: $T) -> T where intrinsics.type_is_numeric(T) {
Here we demand that T be a numeric type. This uses core:instrinsics, which you’ll have to import. The condition of the where is required to be possible to evaluate at compile-time. The code in intrinsics contains special ‘intrinsic procedures’ that are defined by the compiler and thus available at compile-time.
Now, say that you want to create an array of random size (again, silly thing to do perhaps, but it’s a simple example):
make_random_sized_slice :: proc($T: typeid, max_size: int) -> []T {
	// this proc is part of `core:math/rand`
	random_size := rand.int31_max(max_size)
	return make([]T, random_size)
}
We can use this proc like this:
my_slice := make_random_sized_slice(f32, 1000)
my_slice will then be a slice of type []f32 with any size between 0 and 1000.
The difference between this and the ‘clamp’ example is that in this one I moved the $T to the parameter name instead of having it on the type. I.e. I wrote $T: typeid where as the clamp proc did val, min, max: $T. What is this typeid thing we use here? It is the “type of types”, or rather, the unique identifier for each type. We can then use T in the code to refer to this type. Note that we cannot just type T: typeid in the parameter list, the $ has to be there so that the compiler knows we intend to use this value as a compile-time constant. You can have procs that have a parameter T: typeid, but then T would not be possible to use at compile-time. We need T to be usable at compile-time because we write []T further down, and []T is itself a type, which must be known at compile-time.
We can also see it like this: In the clamp example we made a proc that accepts a parameter of a generic type. We can in that proc then use both the value and the type. In the ‘make_random_sized_slice’ example we only needed a type, since we wanted to generate something of a specific type, we had no value to send into it!
Finally, we can use similar things to create generic structs:
Special_Array :: struct($T: typeid, $N: int) {
	items: [N]T,
	num_items_used: int,
}
We see that this generic struct accepts a typeid that is used to choose the type of the items array. Similarly, we also put in $N: int, which gives us a compile-time value to use for the size of the items array.
We can then use this generic struct definition like so:
array: Special_Array(f64, 128)
array will then be a variable that is of the Special_Array type. The field items inside array will contain 128 items of type f64.
We can make procedures that use these generic structs:
find_random_thing_in_special_array :: proc(arr: Special_Array($T, $N)) -> T {
	return arr.items[rand.int31_max(arr.num_items_used)]
}

array: Special_Array(f64, 128)
random_thing := find_random_thing_in_special_array(array)
We see that this proc can figure out the type T it needs for the return value from the Special_Array($T, $N) in the parameter list. It will know what those T and N are based on the Special_Array we sent in.
You can also limit, or specialize, what types that are allowed, here’s an example from the overview:
make_slice :: proc($T: typeid/[]$E, len: int) -> T {
	return make(T, len)
}
This proc makes slices of a certain type. But the / just after the typeid limits the possible types it accepts. In this case T must be a typeid that is a slice, but the item type of the slice is still generic.
Getting comfy with manual memory management
We’ve already seen how you can switch out context.allocator and how you can delete memory you’ve allocated previously.
So in a sense, whenever you need dynamic memory, be it for a dynamic array or for creating a new slice, then just use make([dynamic]int) or make([]int, 1024), which will use context.allocator.
When you don’t want that memory anymore, then you call delete(your_dynamically_allocated_thing)
Tracking memory leaks
However, a common problem is that you might forget delete, which may lead to a memory leak. For something that is allocated once at startup, a memory leak is of little concern. But if you allocate memory over and over and always forget to delete it, then your program’s memory usage will continuously grow.
To find memory leaks, I would advice that you use a tracking allocator. Here’s how to do it (this example is from the overview):
package main

import "core:fmt"
import "core:mem"

main :: proc() {
	when ODIN_DEBUG {
		track: mem.Tracking_Allocator
		mem.tracking_allocator_init(&track, context.allocator)
		context.allocator = mem.tracking_allocator(&track)

		defer {
			if len(track.allocation_map) > 0 {
				fmt.eprintf("=== %v allocations not freed: ===\n", len(track.allocation_map))
				for _, entry in track.allocation_map {
					fmt.eprintf("- %v bytes @ %v\n", entry.size, entry.location)
				}
			}
			if len(track.bad_free_array) > 0 {
				fmt.eprintf("=== %v incorrect frees: ===\n", len(track.bad_free_array))
				for entry in track.bad_free_array {
					fmt.eprintf("- %p @ %v\n", entry.memory, entry.location)
				}
			}
			mem.tracking_allocator_destroy(&track)
		}
	}


	do_stuff()
}
What this code does is swap out context.allocator for a a tracking allocator. The tracking allocator “wraps” the original context.allocator. But whenever an allocation happens (for example, when a dynamic array tries to grow as part of calling append), then then it records that allocation on a big list along with where in the code the allocation happened. When memory is freed, then the allocations are removed from that big list.
When your program shuts down, it will check if anything is still inside that big list, and if it is then it will print a warning about this. This makes manual memory management much less scary.
The tracking allocator will also write warnings if you did any ‘bad frees’, which means trying to free memory that wasn’t actually allocated.
Note that we use defer here to make the printing of memory leaks and bad frees happen at the end of the main proc. Here we are making the whole block of code that follows the defer get deferred, rather than a single line.
Also note that the when ODIN_DEBUG { line will make this code only run if the -debug compiler flag is set, this flag will automatically setup the ODIN_DEBUG for you. This means that the setup and checking of the tracking allocator will only happen if you compile with -debug.
As I’ve said before defer happens at the end of the current scope. However, when doesn’t create a ‘real scope’, the defer stills happens at the end of the main scope. Here’s a short example to further illustrate how this works:
main :: proc() {
	// note: nameless scope starts here
	{
		when ODIN_DEBUG {
			number: int
			defer {
				fmt.println("hello")
			}
		}

		// you can still use number here:
		number = 7

	} // hello will print at this curly brace

	do_stuff()
}
As you see variables created within that when block still exist after it, and the defer happens at the end of the surrounding scope. If it didn’t work like this, then when wouldn’t be very useful.
You can also watch this video I made on the tracking allocator:
Temp allocator
Many times you need to allocate some dynamic memory, but you do not need it later. Some algorithms may require a dynamic array to do some processing, but the dynamic array is not needed when the algorithm finishes.
So if you have code like this:
great_algorithm :: proc() -> int {
	numbers: [dynamic]int

	for i in 0..<100 {
		append(&numbers, i)
	}

	rand.shuffle(numbers[:])
	n := numbers[0]
	delete(numbers)
	return n
}
append() will need to grow the dynamic array. As you see we shuffle (randomize) the array and then pick the first thing in it and then return it. Before we return we delete the dynamic array, avoiding a memory leak.
In this kind of situation, I would instead use the temp allocator:
great_algorithm :: proc() -> int {
	numbers := make([dynamic]int, context.temp_allocator)

	for i in 0..<100 {
		append(&numbers, i)
	}

	rand.shuffle(numbers[:])
	return numbers[0]
}
I.e. we tell the dynamic array to use the context.temp_allocator to allocate memory. This means that we do not ‘care’ about this memory in the long run.
For how long is the memory allocated using the temp allocator valid? Until you run free_all(context.temp_allocator). It is up to you to put this line at some place in your program. It will free all the memory in the temp allocator. I make video games and such programs usually have a ‘main loop’, so for video games it is convenient to put the free_all as the last line of the main loop. This means that you can expect all temp allocated memory to be valid until the end of the current ‘main loop lap’ (known as the current frame).
Do not forget the free_all line, if you do and you use the temp allocator, then you will get memory leaks and see ever increasing memory usage.
TECHNICALITY: I said that
free_all(context.temp_allocator)frees all the memory on the temp allocator, but for the default temp allocator this is half-true. That allocator uses blocks to put your temp allocations in. If the current block is full, then it makes a new block. Whenfree_allis run, then it frees all the blocks except for the first one, since it can reuse that. This is just an optimization, since memory allocations can be slow it is a good idea to just reuse the first block of the temp allocator.
The combination tracking long-term allocations and using temp allocator for short term things makes manual memory management very comfy.
Strings
Strings in Odin use UTF8. This is different from using ASCII, where characters are always a byte. In UTF8 a character can be of varying memory size. English characters still just use single byte, but characters from other languages can use more memory. If you want a quick overview of this, then you can read this entertaining article.
You can create and loop over a string:
my_string := "Hi, hello. How are you?"

for r in my_string {
	// here r is of type rune
}
This loop will loop over the string UTF8 character by character, not byte-by-byte. r is of type rune, this is Odin’s type for denoting a single UTF8 character. In the package core:unicode/utf8 you will find lots of nice procedures to work with runes.
Also, in core:string you’ll find lots of nice procedures to work with strings, I’ll talk about some of them later.
Package system and code organization
When you compile and run your program using odin run . then it takes all files in the current directory (.) and compiles them as a single package.
When you do
import "core:fmt"
then you are importing the package fmt from the standard library. This means that all the stuff in the folder <odin_compiler_dir>/core/fmt will be available under the name fmt.
If you want to have some different name for an import, then you can rename them when importing. This is common when importing the raylib bindings (a library for creating video games):
import rl "vendor:raylib"
Now all those things from the folder <odin_compiler_dir>/vendor/raylib are available under the name rl
Thanks to this, unfixable name conflicts between packages can never happen. If two packages use the same folder name like so:
import "core:fmt"
import "my_localization_system/fmt"
then you can fix this by just giving one of them a local alias:
import "core:fmt"
import lfmt "my_localization_system/fmt"
In Odin the program that uses packages can never end up in a state where the packages themselves pollute a global namespace with names that collide, since everything inside them end up under these prefixes such as fmt. and rl.
Those who have programmed C a lot can testify that name collisions between libraries do happen. Because of this C libs often have prefixes on all the stuff they expose. In Odin the prefix is instead chosen at the import site, which is more robust.
You can create local packages within your project by just creating a folder and importing it:
import xp "xml_parser"
The package line at the top of files
At the top of each file you must have a line like
package my_video_game
As you’ve seen, the name of the package just seems to be the name of the directory, or whatever alias you give the package when you import it. So what is the use of that package line?
The package line is for identifying the package when it has been compiled as a library and subsequently been linked into some other library or program. In other words it is for ABI linking, and should be unique. However, for an Odin program that just imports this package in the form of source code, the package line does not really matter. But if you ever intend to ship your package as a pre-compiled library, then please choose a unique package name.
Opinion: Use packages for libraries, not as namespaces
I would encourage you to only split things out to separate packages if those things are absolutely independent. So for example a generic XML parser could be such a package. But if you just want to compartmentalize some code then I recommend to keep that code within your main program package and instead add prefixes to proc names etc, just like in C.
This means that instead of making a renderer sub-package so that you can write renderer.init(), just keep all the renderer stuff in you main program package and name the proc renderer_init instead.
The Odin package system does not allow cyclic dependencies, so package A can import package B only if package B does not import package A. With this in mind, I would say that the Odin package system is mainly for creating libraries that are totally independent.
That said, there are some people who have successfully used packages to compartmentalize their project. But in my experience it just leads to pain and suffering because you will suddenly need a cyclic dependency, and you can’t have it.
Some may balk at the idea of using prefixes within a project, they want to use packages as some sort of namespace but still have cyclic dependencies. I would encourage you to just try using prefixed proc names etc, it is not that big of a deal. This is in line with Odin trying to be a better C while still keeping things very simple.
Finding your way around core (the standard library)
Let’s take a look at how to do some different things using the standard library that comes with Odin. The standard library is essentially a bunch of different packages that you find in <odin_compiler_dir>/core
Like I said earlier, I really recommend that you pull in <odin_compiler_dir>/core into your text editor so that you can search for words and symbols in there. The code in the standard library is very readable and you can learn a lot from it!
Reading and writing files (core:os)
You can easily read and write files. Import the functionality like so:
import "core:os"
Then you can read an entire file called my_file like this:
if data, ok := os.read_entire_file("my_file"); ok {
	// The file was successfully read.
	// data is of type []byte -- i.e. a slice
	// containing the whole contents of the file
	// in the the form of bytes.
}
data will be allocated using context.allocator. I often read files using the temp allocator since I will process the data into another format anyways:
if data, ok := os.read_entire_file("my_file", context.temp_allocator); ok {
}
You can write to a file “my_file” like this:
if !os.write_entire_file("my_file", data) {
	// Something went wrong!
	// Maybe print an error?
}
os.write_entire_file returns false if it failed to write the file, which is what this if is checking for. data needs to be of type []byte
Read and write structs as JSON (core:encoding/json)
Odin comes with a JSON library that can convert structs into JSON (marshal) and then also convert that JSON back into structs (unmarshal).
Import the functionality like so:
import "core:encoding/json"
You can then convert a struct into JSON like this:
Some_Struct :: struct {
	some_field: int,
}

my_struct := Some_Struct {
	some_field = 7,
}

if json_data, err := json.marshal(my_struct, allocator = context.temp_allocator); err == nil {
	// json_data is of type []byte,
	// so can write it directly to a file:
	if !os.write_entire_file("my_struct_file", json_data) {
		fmt.println("Couldn't write file!")
	}
} else {
	fmt.println("Couldn't marshal struct!")
}
json.marshal will convert the struct into JSON. Note that second return value of json.marshal is a union. This union is nil if there was no error. I also included some code for writing out the JSON data to a file, using the core:os package.
Note that I used context.temp_allocator for the marshalling because quite often one only needs the data around for writing the data out to a file or similar, which is what I do in this case.
You can read back your written file into your struct like this:
if json_data, ok := os.read_entire_file("my_struct_file", context.temp_allocator); ok {
	my_struct: Some_Struct

	if json.unmarshal(json_data, &my_struct) == nil {
		// my_struct now contains
		// the data from my_struct_file.
	} else {
		fmt.println("Failed to unmarshal JSON")
	}
} else {
	fmt.println("Failed to read my_struct_file")
}
Note that json.unmarshal may allocate memory if your struct contains for example slices, dynamic arrays or strings. It is up to you to free this memory when you no longer need the struct around. In the next section I show how you can manage this more easily using an arena allocator.
<odin_compiler_dir>/core/encoding/json/marshal.odin(andunmarshal.odin) are great examples of how you can use the reflection system in Odin to get runtime type information. I suggest you study those files if you want to know how the reflection system works.
Virtual memory arena allocators (core:mem/virtual)
Say that you use the JSON loader to load a complicated thing such as a video game level. The level might contain strings, arrays etc, all which the JSON loader will separately allocate memory for.
In order to make the unloading of all this dynamically allocated data easier, you can use an arena allocator.
There are a couple of different arena allocators in core, here we will use the virtual memory growing allocator, which is the most flexible:
import vmem `core:mem/virtual`
You then load the level from disk and unmarshal the JSON into it:
Level :: struct {
name: string,
objects: []Game_Object,
tiles: []Tiles,
}
current_level: Level
current_level_arena: vmem.Arena
load_level :: proc(filename: string) {
if json_data, ok := os.read_entire_file(filename, context.temp_allocator); ok {
level: Level
level_arena: vmem.Arena
arena_allocator := vmem.arena_allocator(&level_arena)
if json.unmarshal(json_data, &level, allocator = arena_allocator) == nil {
// All the memory for the name, objects
// and tiles fields inside `Level` will
// be allocated on the arena.
// Set some global variables
// for the current level.
current_level = level
current_level_arena = level_arena
}
}
}
unload_level :: proc() {
vmem.arena_destroy(¤t_level_arena)
current_level = {}
}
load_level creates an arena and feeds json.unmarshal an allocator that can allocate memory into the arena. The virtual memory arena we’re using here can grow. When it grows it will allocate new blocks of memory. Internally in the arena, those blocks form a linked list so that the arena can keep track of all of them.
Later, you can run unload_level. This proc runs vmem.arena_destroy(¤t_level_arena). This will free all the memory that was allocated while json.unmarshal ran, even though this memory is split into different fields of Level: name, objects and tiles. If you had used the default allocator you would have had to free all of them separately. This can be very useful in cases where you have a complicated tree of data with lots of lists and strings.
Working with strings (core:strings)
The core:strings package has lots of nice procedures to work with strings.
Import it using:
import "core:strings"
One common operation you can do is clone strings:
some_string := "A string"
copied_string := strings.clone(some_string)
this copied string will be allocated using context.allocator or whichever allocator you send into clone as second parameter.
You can also create a string by cloning a series of bytes:
from_bytes := strings.clone_from_bytes(some_bytes)
here some_bytes can for example be a slice of a file. You can also turn a whole byte slice into a string without an extra allocation: my_string := string(some_bytes).
Sometimes you need to build a string in several steps, you can then use a builder:
lines := []string {
	"I like",
	"I look for",
	"Where are the",
}
b := strings.builder_make()

for l, i in lines {
	strings.write_string(&b, l)
	if i != len(lines) - 1{
		strings.write_string(&b, " cats.\n")
	} else {
		strings.write_string(&b, " cats?")
	}
}

str := strings.to_string(b)
fmt.println(str)
This will print the following to the console:
I like cats.
I look for cats.
Where are the cats?
You can pass context.temp_allocator to builder_make if you don’t need the string in the long run.
Using the logger
Odin comes with a built in logger. Instead of using fmt.println everywhere you acn use log.info and log.error etc to log stuff, and you can choose if it should go to a file or to the console.
To send it to the console, do this:
package main

import "core:log"

main :: proc() {
	logger := log.create_console_logger()
	context.logger = logger

	// Rest of program goes here,
	// it will use context.logger whenever
	// you run `log.info`, `log.error` etc.
	log.info("Program started")
	all_the_code_in_your_program()

	log.destroy_console_logger(&logger)
}
Here we assign context.logger to a console logger. Since this happens at the start of main, all subsequent procedure calls (i.e. your whole program), will use this logger as well.
You can also send the log output to a file:
package main

import "core:log"
import "core:os"

main :: proc() {
	mode: int = 0
	when ODIN_OS == .Linux || ODIN_OS == .Darwin {
		mode = os.S_IRUSR | os.S_IWUSR | os.S_IRGRP | os.S_IROTH
	}

	logh, logh_err := os.open("log.txt", (os.O_CREATE | os.O_TRUNC | os.O_RDWR), mode)

	if logh_err == os.ERROR_NONE {
		os.stdout = logh
		os.stderr = logh
	}

	logger := logh_err == os.ERROR_NONE ? log.create_file_logger(logh) : log.create_console_logger()
	context.logger = logger

	// Rest of program goes here, it will use
	// context.logger whenever you run `log.info`,
	// `log.error` etc.
	//
	// Also, fmt.println will be redirected to the
	// logger, due to the os.stdout = logh lines above.
	all_the_code_in_your_program()

	if logh_err == os.ERROR_NONE {
		log.destroy_file_logger(&logger)
		os.close(logh)
	}
}
The code above opens a file using os.open. I have provided the flags required to make it work on Linux/macOS too. As you can see, if logh_err is os.ERROR_NONE, which means that it succeeded in opening a file to write to, then it runs log.create_file_logger(logh). If it fails to open the file then it uses a console logger instead.
This part of the code is optional:
if logh_err == os.ERROR_NONE {
	os.stdout = logh
	os.stderr = logh
}
What it does is redirect the fmt.printfln() etc to the log file. But if you have the logger setup properly, then I recommend just using the procs under the log package whenever you can.
Available procs for logging area:
log.debug("message")
log.info("message")
log.warn("message")
log.error("message")
log.fatal("message")
log.panic("message")
These are in order for “severity”. log.panic is special in the sense that it logs, but unlike the others it also shuts down the program.
All those log procs also have a version that ends with f, such as log.errorf, that one uses a format string so you can do stuff like log.errorf("The thing called %v is broken", name_of_thing).
Have a look in <odin_compiler_dir>/core/log/log.odin to see how the log systems works in detail.
Start a new thread (core:thread)
To start a thread, you can do something like this:
import "core:thread"

Worker_Thread_Data :: struct {
	// run is optional, it's useful if your thread
	// needs to run in a loop until you tell it to
	// stop. If the thread just needs to do a task
	// and then stop, then you can skip this bool
	// and the code that uses it.
	run: bool,

	// Add data your thread needs here.

	thread: ^thread.Thread
}

worker_thread_proc :: proc(t: ^thread.Thread) {
	d := (^Worker_Thread_Data)(t.data)
	for d.run {
		// let your thread do stuff

		// you can make this thread run a little
		// slower using a sleep
		// (you'll need to import "core:time")
		// time.sleep(10*time.Millisecond)
	}
}

start_worker_thread :: proc(d: ^Worker_Thread_Data) {
	d.run = true
	if d.thread = thread.create(worker_thread_proc); d.thread != nil {
		d.thread.init_context = context
		d.thread.data = rawptr(d)
		thread.start(d.thread)
	}
}

stop_worker_thread :: proc(d: ^Worker_Thread_Data) {
	d.run = false
	thread.join(d.thread)
	thread.destroy(d.thread)
}
This will create a thread when you run start_worker_thread. It will run forever until you call stop_worker_thread with the same struct pointer.
The line d.thread.init_context = context makes the thread we are starting use the same context, however, it will still get its own temp allocator.
Using core:time to do things periodically
One often wants to record the current time and then wait until a number of seconds has passed before doing an action. Here’s a small program that uses core:time to periodically print a message:
package main

import "core:time"
import "core:fmt"

main :: proc() {
	start_time := time.now()
	last_print_time := time.now()

	for {
		current_time := time.now()

		if time.duration_seconds(time.diff(last_print_time, current_time)) > 1 {
			fmt.println("One second passed")
			last_print_time = current_time
		}

		if time.duration_minutes(time.since(start_time)) > 2 {
			fmt.println("Two minutes has passed, shutting down!")
			break
		}
	}
}
Here we see that we can fetch the current time using time.now(). We can later compare one time to another using either time.diff(start_time, end_time) or by doing time.since(start_time). The since proc just does time.diff(start_time, time.now()). The diff and since procs return a time.Duration struct object, that can be converted into seconds, minutes or hours etc using procs like time.duration_second().
See <odin_compiler_dir>/core/time/time.odin for more examples on useful procs to work with time.
Linear algebra math operations (core:math/linalg)
If you need to compare length of vectors and normalize them etc, then you can do that using the linalg package:
import "core:math/linalg"
Vector3 :: [3]f32

v := Vector3 {2, 3, 5}
v_length := linalg.length(v)
// normalize0 returns 0 if the length v is 0
v_normalized := linalg.normalize0(v)
I recommend that you open <odin_compiler_dir>/core/math/linalg/general.odin and have a look at what’s available.
A nice thing is that these procs don’t force you to use a specific vector type. In most cases any numeric array will work. This is thanks to Odin’s great array programming system that lets you do math operations on arrays directly.
Creating random numbers and shuffling arrays (core:math/rand)
Import the rand package to create random numbers:
import "core:math/rand"
With this package you can do stuff like
random_num := rand.uint32()
which will get you a random number between 0 and max(u32).
You can also make random numbers within a range of your choosing:
random_num := rand.int31_max(128)
This will return a random number in the range [0, 128).
The rand package also lets you shuffle slices:
arr: [128]int

for i in 0..<len(arr) {
	arr[i] = i
}

rand.shuffle(arr[:])
You can set the seed of the global random generator if you wish:
// Run this line at for example program start
seed := time.time_to_unix(time.now())
rand.reset(u64(seed))

// Later when you use rand.uint32() it will use the seed
random_num := rand.uint32()
Make a game using Raylib (vendor:raylib)
Odin comes with bindings for Raylib, a library for creating video games. Raylib can open windows, draw graphics, play sound and process input. Here’s how you open a window and start a game loop that constantly clears the screen with a blue color:
package game

import rl "vendor:raylib"

main :: proc() {
	rl.InitWindow(1280, 720, "Raylib Game")

	for !rl.WindowShouldClose() {
		rl.BeginDrawing()
		rl.ClearBackground(rl.BLUE)
		rl.EndDrawing()
	}
	rl.CloseWindow()
}
Going deep into Raylib is outside the scope of this article, but I encourage you to open <odin_compiler_dir>/vendor/raylib/raylib.odin and explore the available procedures.
Raylib is written in C and requires a C library to work. But the compiler takes care of linking in that C library for you. You can see how that works if you look inside raylib.odin and search for the foreign import lib stuff.
I have a series on making games using Odin + Raylib. I also have this 90 minute video tutorial where I create a little video game from start to finish:
Where to find more Odin resources
There’s a great list of resources, libraries and software on Jakub Tomšů’s Awesome Odin page
If you’re looking for reference material, then have a look at the overview and also demo.odin. This article, the overview and demo.odin each have unique things that the others don’t cover.
Thanks for reading!
I have created a whole book based on this article! You can read more about it on odinbook.com. It is 5-6 times larger than this blog post.
If you liked this article and want to support me, then you can become a patron.
If you have any questions or wanna discuss what I wrote, then you can join my Discord server.
Have a nice day! /Karl Zylinski