
In this second post about making games using Odin and Raylib we shall look at how to add a simple player character and make it moveable. We will first introduce some simple left to right movement, and after that add gravity and the ability to jump.
Here’s the companion video for this post. If you get confused by this post, then chances are that the companion video can help you understand:
Let’s go!
Drawing something more than just a blue background
The last post left off with our program looking like this:
package game

import rl "vendor:raylib"

main :: proc() {
    rl.InitWindow(1280, 720, "My First Game")

    for !rl.WindowShouldClose() {
        rl.BeginDrawing()
        rl.ClearBackground(rl.BLUE)
        rl.EndDrawing()
    }

    rl.CloseWindow()
}
This game is currently just a pure blue background. Let’s add something more to it. On the row after the line rl.ClearBackground(rl.BLUE), add this:
rl.DrawRectangleV({640,320}, {64, 64}, rl.GREEN)
If you recompile (just hit F7 if you setup the Sublime Build System at the end of the last post) you’ll now see a green box on top of a blue background:
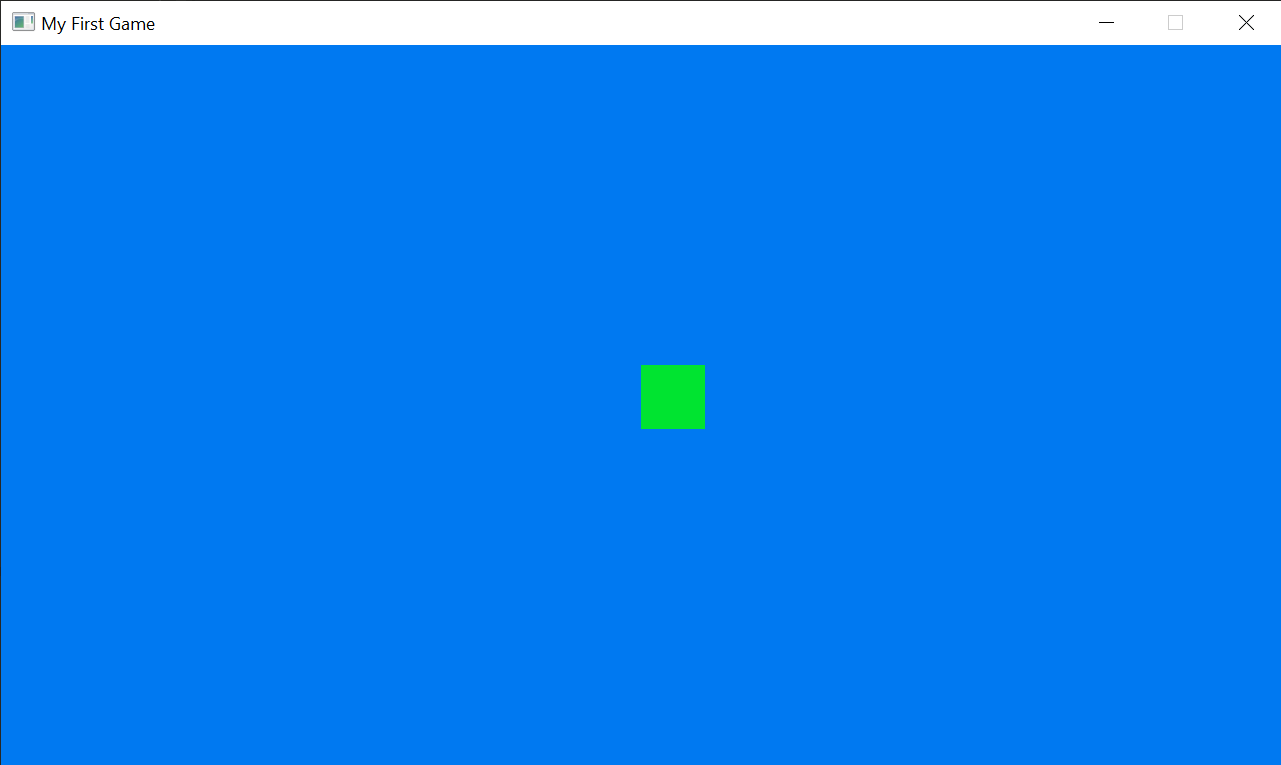
If we look at the line we just added we see that rl.DrawRectangleV seems to be a proc that accepts a couple of numbers and something at the end that tells it that we want a green box. The {640, 320} says that we want the box to be at the position x = 640, y = 320, where x and y are counted from the top left of the window. This is in the middle of our window (remember: we gave rl.InitWindow the window size 1280 by 720). The {64, 64} says how big we want the box to be, i.e. we want it to be 64 pixels wide and 64 pixels high.
How can I know this proc exists in Raylib and also know what things it is possible to feed it? Try this: Open the Windows file explorer and go to c:\odin\vendor (on Mac / Linux open the file browser and go to <where your odin install is>/vendor). In there you’ll see a folder called raylib. The odin files in that folder are the ones that get imported by the line import rl "vendor:raylib" at the top of your program. Go inside the raylib folder and drag & drop raylib.odin into your code editor. Search for DrawRectangleV in there, you should find this line:
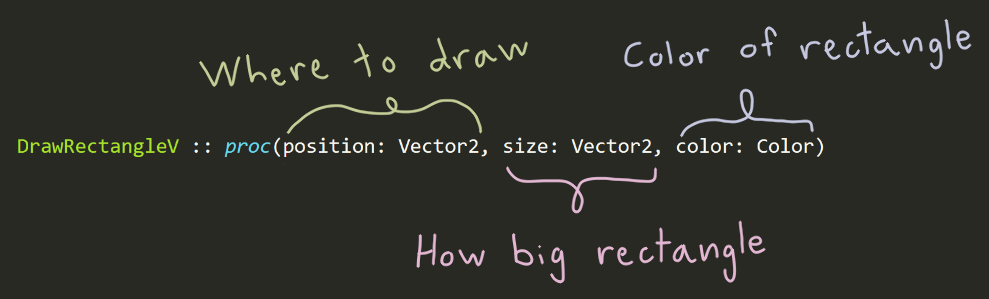
raylib.odin. It’s a proc that accepts three parameters. Those parameters control the position, size and colors of the box.
This line tells us that DrawRectangleV accepts three parameters. The first one is the position of the rectangle, where we put in {640, 320}. The Vector2 to the right of the word position tells us that this proc expects position to be of type Vector2. What is Vector2? It’s just a thing that consists of two decimal numbers. We can use a Vector2 to denote positions, directions and sizes in 2 dimensional space. The second parameter size is also a Vector2, that’s where we sent in {64, 64}.
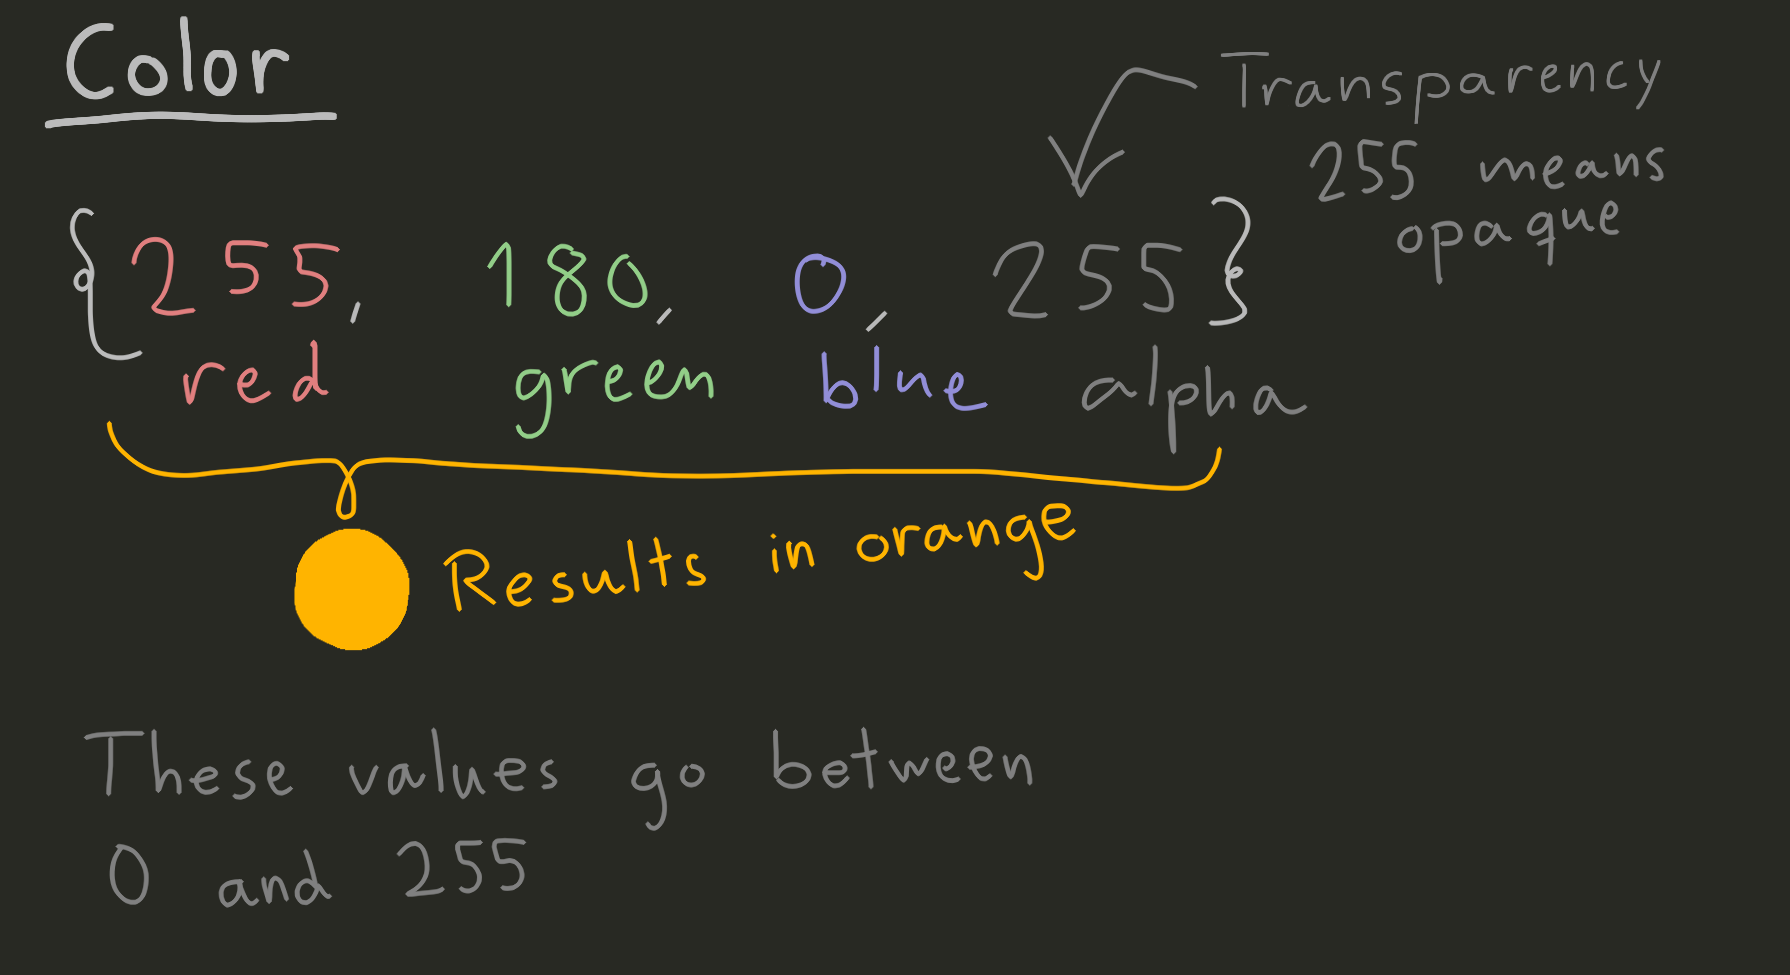
Finally the last parameter is of type Color. Raylib comes with a few predefined colors, such as rl.GREEN. Try replacing rl.GREEN in our code with something like {255, 180, 0, 255}, which should make the box orange instead. Those four numbers denote red, green, blue and alpha respectively. {255, 255, 255, 255} means completely white and {0, 0, 0, 255} means completely black. The alpha number at the end tells Raylib how transparent you want the rectangle to be.
RAYLIB.ODIN IS JUST BINDINGS There’s no actual code inside
raylib.odin, this file simply tells us what procs exist in Raylib and what parameters they need, but not what those procs do internally. This is because Raylib is written in the language C. The Odin code inraylib.odinis only there to instruct our Odin code on how it can talk to Raylib’s C code. This kind of interface to a library written in another language is called a binding.
FINDING THINGS IN RAYLIB QUICKLY If you have both your
main.odinfile andraylib.odinopen in Sublime you can also click onDrawRectangleVin your code and then press the F12 key on your keyboard. Sublime will then try to find where this proc is defined in all your open files. It should jump to the correct line inraylib.odin. You can also pressCtrl + Shift + Rand typeDrawRectangleand get suggestions for all the procs in all your open files that contain those words. You can also drag n drop the wholevendor/raylibdirectory into Sublime and also drag n drop the wholemy_first_gamedirectory into Sublime, to make all files in those two directories available to the F12 command and theCtrl + Shift + Rcommand.
Let’s make the little box controllable!
Let’s say that we want the little green box to be the controllable player character of our game (or perhaps the box it is orange for you now, if you experimented with the colors). Then we need to be able to move it! Raylib comes with a big collection of different procs that allow us to check if keyboard keys, gamepad buttons and mouse buttons have been pressed or are being held down etc.
We currently draw the player at position {640, 320} each frame. Let’s make it so we can change that position. So that we can vary it. First thing we need to do is to move the player position into a variable. Just before the line for !rl.WindowShouldClose() {, add this:
player_pos := rl.Vector2 { 640, 320 }
You may recognize the Vector2 thingy from when we looked inside raylib.odin. What we are saying here is that we want to make a new Vector2 and give it the initial value { 640, 320 }. We give this Vector2 a name: player_pos. This player_pos is now a variable that we can use and modify.
EVERYTHING FROM RAYLIB ENDS UP UNDER .rl PREFIX When you looked at the code inside
raylib.odinthen it just saidVector2, but in your program you must sayrl.Vector2to use that type. This is because everything that comes out of Raylib ends up under therlprefix, as prescribed by the lineimport rl "vendor:raylib". If you want to, you could add a line just before themainproc that saysVec2 :: rl.Vector2. That makes it possible to writeVec2instead ofrl.Vector2.
Change the line that draws the player rectangle so it now says:
rl.DrawRectangleV(player_pos, {64, 64}, rl.GREEN)
If you now re-run the game then… nothing has changed at all. But now we will be able to alter player_pos by checking if keyboard keys are being held. Just before the rl.DrawRectangleV line, add this:
if rl.IsKeyDown(.LEFT) {
    player_pos.x -= 400*rl.GetFrameTime()
}

if rl.IsKeyDown(.RIGHT) {
    player_pos.x += 400*rl.GetFrameTime()
}
Now if you re-run the game and hold down the left or right arrow keys, then this should happen:
Those lines starting with if will run the code inbetween the curly braces if the condition is true:
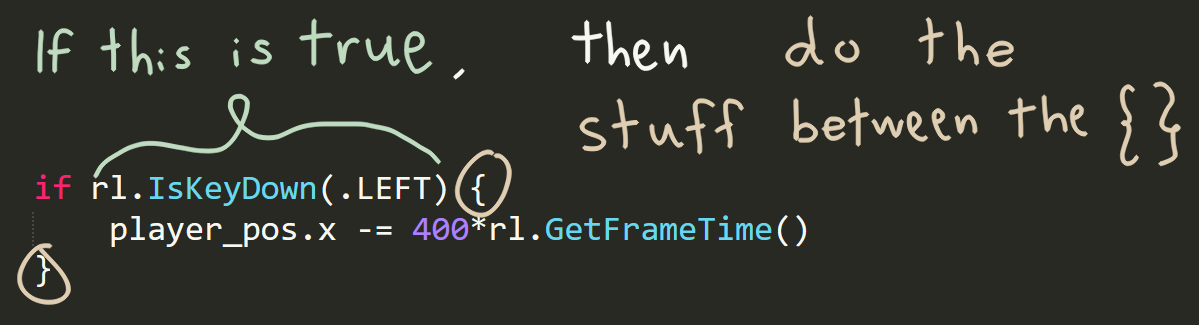
if and the { is the condition for running the code between the two curly braces {}
In this case the condition is rl.IsKeyDown(.LEFT). This check is run every frame of the game, which means many times per second. Remember: Each frame is equivalent to the for !rl.WindowShouldClose() { looping once, and your computer will try to run that loop as fast as it possibly can. It will continuously check if you are holding the left arrow key. And for each frame it is held down, then this will happen: player_pos.x -= 400*rl.GetFrameTime(). This line says to decrease the x component of player_pos by 400*rl.GetFrameTime(). Note the -=, writing it like that is a shorter way of writing player_pos.x = player_pos.x - 400*rl.GetFrameTime().
Now, what about the 400*rl.GetFrameTime() part? My intent is to move the player 400 pixels per second. I can achieve this by multiplying 400 by rl.GetFrameTime(). This works because rl.GetFrameTime() reports how many seconds the previous frame took.
![]()
400*rl.GetFrameTime() each frame.
If that doesn’t make sense, then think of it like this: If your game would suddenly get terrible frame rate and only draw 2 frames per second, then rl.GetFrameTime() would report 0.5 s per frame. So the first frame the box would move 400*0.5=200 pixels and then 400*0.5=200 pixels more the next frame, totaling 400 pixels in one second.
How short can a frame be? If your game runs at 60 frames per second then rl.GetFrameTime() reports something like 0.016 seconds. However, we haven’t put in any kind of limit to our frame rate yet, so rl.GetFrameTime() could very well be reporting tiny values such as 0.00001 s.
As for the second if statement:
if rl.IsKeyDown(.RIGHT) {
    player_pos.x += 400*rl.GetFrameTime()
}
everything is the same except that we are checking if the right arrow key is held, and in that case we are adding instead of subtracting to player_pos.x.
Let’s make it possible to jump!
At this point your main proc should look something like this:
main :: proc() {
    rl.InitWindow(1280, 720, "My First Game")
    player_pos := rl.Vector2 { 640, 320 }

    for !rl.WindowShouldClose() {
        rl.BeginDrawing()
        rl.ClearBackground(rl.BLUE)

        if rl.IsKeyDown(.LEFT) {
            player_pos.x -= 400*rl.GetFrameTime()
        }

        if rl.IsKeyDown(.RIGHT) {
            player_pos.x += 400*rl.GetFrameTime()
        }

        rl.DrawRectangleV(player_pos, {64, 64}, rl.GREEN)
        rl.EndDrawing()
    }

    rl.CloseWindow()
}
Let’s make it so that the player can jump by pressing the space key! Jumping usually involves giving the player a speed upwards and then having gravity pull them down again. In order to represent this we need to add a new variable that can hold the player’s velocity.
PHYSICS LINGO: SPEED VS VELOCITY The word speed just means a single number that represents how fast you are going, without indicating in which direction you are going. The word velocity both specifies how fast you are going, but also in what direction. In a 2D game it is therefore suitable to use a
Vector2to represent the velocity.
Just after the line player_pos := rl.Vector2 { 640, 320 }, add this line:
player_vel: rl.Vector2
Where “vel” in player_vel is short for “velocity”.
In Odin, writing a variable name such as player_vel followed by a : and then the type rl.Vector2 will make a new rl.Vector2 and set both the x and y parts to zero. In Odin, whenever you don’t say what initial value a new variable has, it always gets a zero value. Note the difference around the : in these two lines:
player_pos := rl.Vector2 { 640, 320 }
player_vel: rl.Vector2
When you want to both create a new variable and also give it a specific value, you then use :=, but if you only want to make a new variable without specifying a value, then you can use : (in which case it will be default-initialized to all zeroes). Furthermore, this:
player_pos := rl.Vector2 { 640, 320 }
is identical to this:
player_pos: rl.Vector2 = { 640, 320 }
The latter one looks like the player_vel line, but with a value tacked on the end. But both lines have the same effect: You’re creating a new variable of type rl.Vector2 that has the initial value {640, 320}.
Anyways, back to actually using this player_vel. Let’s replace this code:
if rl.IsKeyDown(.LEFT) {
    player_pos.x -= 400*rl.GetFrameTime()
}

if rl.IsKeyDown(.RIGHT) {
    player_pos.x += 400*rl.GetFrameTime()
}
with this code:
if rl.IsKeyDown(.LEFT) {
    player_vel.x = -400
} else if rl.IsKeyDown(.RIGHT) {
    player_vel.x = 400
} else {
    player_vel.x = 0
}

player_pos += player_vel * rl.GetFrameTime()
If you compile and run, everything should be like before, but behind the scenes player_vel is now used to alter player_pos. Soon we will add jumping, but there are three things to note about these changes:
Firstly, we now set player_vel.x when the left or right arrow is held, we do not add or subtract to it. We just set it to the value we want. The addition happens later on the player_pos += player_vel * rl.GetFrameTime() line. If none of the arrow keys are held, then we set player_vel.x to zero.
Secondly, before this we’ve used += to add to variables that contain a single number. However, both player_pos and player_vel are Vector2, i.e. they contain two numbers. In Odin the math operators such as +, +=, *, - etc all work on both single numbers, but they also work on arrays of numbers, given that the two arrays contain the same number of things. What’s an array? It’s essentially a list of things. A Vector2 is an array of size 2 that contains decimal numbers. We’ll look more at arrays later.
Thirdly, we now only multiply by rl.GetFrameTime() in one place. We multiply the whole player_vel by this, giving us how far the player should move this frame.
Now, let’s add the jumping. Just before the line player_pos += player_vel * rl.GetFrameTime(), add this:
player_vel.y += 2000 * rl.GetFrameTime()

if rl.IsKeyPressed(.SPACE) {
    player_vel.y = -600
}
The first new line, player_vel.y += 2000 * rl.GetFrameTime(), simulates gravity. It will constantly increase the y component of the player’s velocity, pulling the player downwards on the screen at an ever increasing speed. The number 2000 is chosen arbitrarily, it’s just a number that feels good when playing. Note that we have to multiply 2000 by rl.GetFrameTime(). This is because we are accelerating the player, and we want to apply the same amount of downwards acceleration per second.
The rest of the new lines check if the space key has been pressed this frame, and if it has, it sets the y component of the velocity to -600, which is a fairly fast upwards velocity.
Note the difference between this:
if rl.IsKeyPressed(.SPACE) {
and the earlier code we wrote:
if rl.IsKeyDown(.LEFT) {
The first one says IsKeyPressed, the second one says IsKeyDown. The IsKeyPressed proc checks if the key has just been pressed. It will only be true for a single frame. The IsKeyDown check will be true for as long as the key is kept held down. We only want to jump once when pressing space, but we want to be able to continuously walk left and right.
If we run the game now, all that happens is this silly thing:
There’s no floor in our world! Let’s add that. Just after player_pos += player_vel * rl.GetFrameTime(), do this:
if player_pos.y > f32(rl.GetScreenHeight()) - 64 {
    player_pos.y = f32(rl.GetScreenHeight()) - 64
}
What this code does is that it checks if the y component of the players position is bigger than the height of the screen minus 64. If it is, then it moves the player back up. If that’s confusing, I try to illustrate this in this picture:

player_pos.y has become bigger than rl.GetScreenHeight() - 64.
Remember that the player’s height is 64 pixels. The position of the player is actually the top left position of the rectangle. Therefore, if we want to check if the bottom of the player is outside the bottom of the screen, then we need to check if player_pos.y is bigger than the height of the screen minus 64.
If this is the case, then we snap player_pos.y to a value that makes the player sit so that the bottom of the player touches the bottom of the screen.
WHY USE rl.GetScreenHeight()? Raylib provides the height of the screen using
rl.GetScreenHeight(). This proc will return720, i.e. the value we initially fed intorl.InitWindow. It’s a good idea to ask raylib instead of just writing720, as the window might have changed size.
What’s up with that f32( thing in if player_pos.y > f32(rl.GetScreenHeight()) - 64 {? As I’ve said before the player’s position is a Vector2, and a Vector2 consists of decimal numbers. The type of those decimal numbers is actually called f32, which stands for “32 bit floating point number”. So a Vector2 is actually just two f32 values tucked into a single thing called a Vector2. Now, rl.GetScreenHeight() gives you a value of type i32, which stands for “32 bit integer number”. Odin doesn’t automatically convert integers to decimal numbers etc, you have to do that yourself. So in order to be able to compare the decimals numbers in the player’s position to the screen height, we must convert the screen height to a decimal number too. The f32() thingy that surrounds the rl.GetScreenHeight() does just that, it is called a cast and it’s a way to convert one type to another type.
If you now play the game again, you can walk around with the arrow keys and press space to jump:
If you play your lil’ game for more than 10 seconds you’ll probably notice something funny: You can jump while in the air…
That’s hardly realistic! Unless you wanna make flappy bird or something. But we wanna make 2D platformer mechanics, so let’s fix it.
Disallowing jumping while in the air
There are several different ways to fix things like this. We’re gonna add a variable called player_grounded and use that to make sure you can only jump when you’re standing on the ground.
Just after the line player_vel: rl.Vector2, add this line:
player_grounded: bool
This creates a new variable called player_grounded of type bool. bool is a special type of variable that can only take on two values: true or false. Just like with player_vel we did not explicitly say what value player_grounded starts at, which means it will have “the zero value”, which in this case means false.
Change this code:
if player_pos.y > f32(rl.GetScreenHeight()) - 64 {
    player_pos.y = f32(rl.GetScreenHeight()) - 64
}
so that it now says this:
if player_pos.y > f32(rl.GetScreenHeight()) - 64 {
    player_pos.y = f32(rl.GetScreenHeight()) - 64
    player_grounded = true
}
I.e. when the player hits the floor we say that the player is grounded.
We can now change the code that makes the player jump from this:
if rl.IsKeyPressed(.SPACE) {
    player_vel.y = -600
}
to this
if player_grounded && rl.IsKeyPressed(.SPACE) {
    player_vel.y = -600
    player_grounded = false
}
There are two changes here:
Firstly, there is now a player_grounded && thingy before the rl.IsKeyPressed. What this does is check if both player_grounded is true and also if rl.IsKeyPressed(.SPACE) returns true. && is called the AND operator and it is used to check if two bool values are both true. But then you might say: “But Karl! player_grounded is of type bool, but rl.IsKeyPressed(.SPACE) is a call to a proc in Raylib.” Yes. But procs can return values, and in this case the type that these rl.IsKeyPressed/rl.IsKeyDown/rl.WindowShouldClose procs have been returning are all of type bool. If you and look up IsKeyPressed in raylib.odin, you’ll see this:
IsKeyPressed :: proc(key: KeyboardKey) -> bool
The -> bool at the end is telling us what type of value this proc returns.
The second change is that we now set player_grounded = false when you press space, so that you can’t jump again until you’ve hit ground, at which point the player_grounded will become true again.
Now, if you run the game again, you’ll finally have a jumping mechanic that works properly. No more jumping while in the air!
Final code
We are at the end of today’s post, the code should now look like this:
package game

import rl "vendor:raylib"

main :: proc() {
    rl.InitWindow(1280, 720, "My First Game")
    player_pos := rl.Vector2 { 640, 320 }
    player_vel: rl.Vector2
    player_grounded: bool

    for !rl.WindowShouldClose() {
        rl.BeginDrawing()
        rl.ClearBackground(rl.BLUE)

        if rl.IsKeyDown(.LEFT) {
            player_vel.x = -400
        } else if rl.IsKeyDown(.RIGHT) {
            player_vel.x = 400
        } else {
            player_vel.x = 0
        }

        player_vel.y += 2000 * rl.GetFrameTime()

        if player_grounded && rl.IsKeyPressed(.SPACE) {
            player_vel.y = -600
            player_grounded = false
        }

        player_pos += player_vel * rl.GetFrameTime()

        if player_pos.y > f32(rl.GetScreenHeight()) - 64 {
            player_pos.y = f32(rl.GetScreenHeight()) - 64
            player_grounded = true
        }

        rl.DrawRectangleV(player_pos, {64, 64}, rl.GREEN)
        rl.EndDrawing()
    }

    rl.CloseWindow()
}
That’s it for today!
Thanks for reading! I hope to see you in part 3, where we replace the green box with an animation.
Please leave any questions as comments on the video version of this post. I will reply to some of them in text, but I will also every now and then do a live stream where I reply to questions and take additional questions from the viewers.
Also, if you’ve enjoyed this series so far and want to support me, then please consider buying my game CAT & ONION on itch.io or wishlist it on Steam. When you buy on itch.io you also get the full Odin + Raylib source of the game.
Have a great day!
/Karl